15-Minute Canned Black Beans Recipe
Transform a humble can of black beans into the best side dish (Canned Black Beans) you’ve had all week with just a few pantry spices and about 15 minutes.
I used to think canned black beans were just… fine. Something you dump into a burrito bowl or heat up when you forgot to meal prep. But once I learned this simple technique for making black beans canned into something truly crave-worthy, everything changed. Now I make these at least twice a week, and my family actually gets excited about beans.
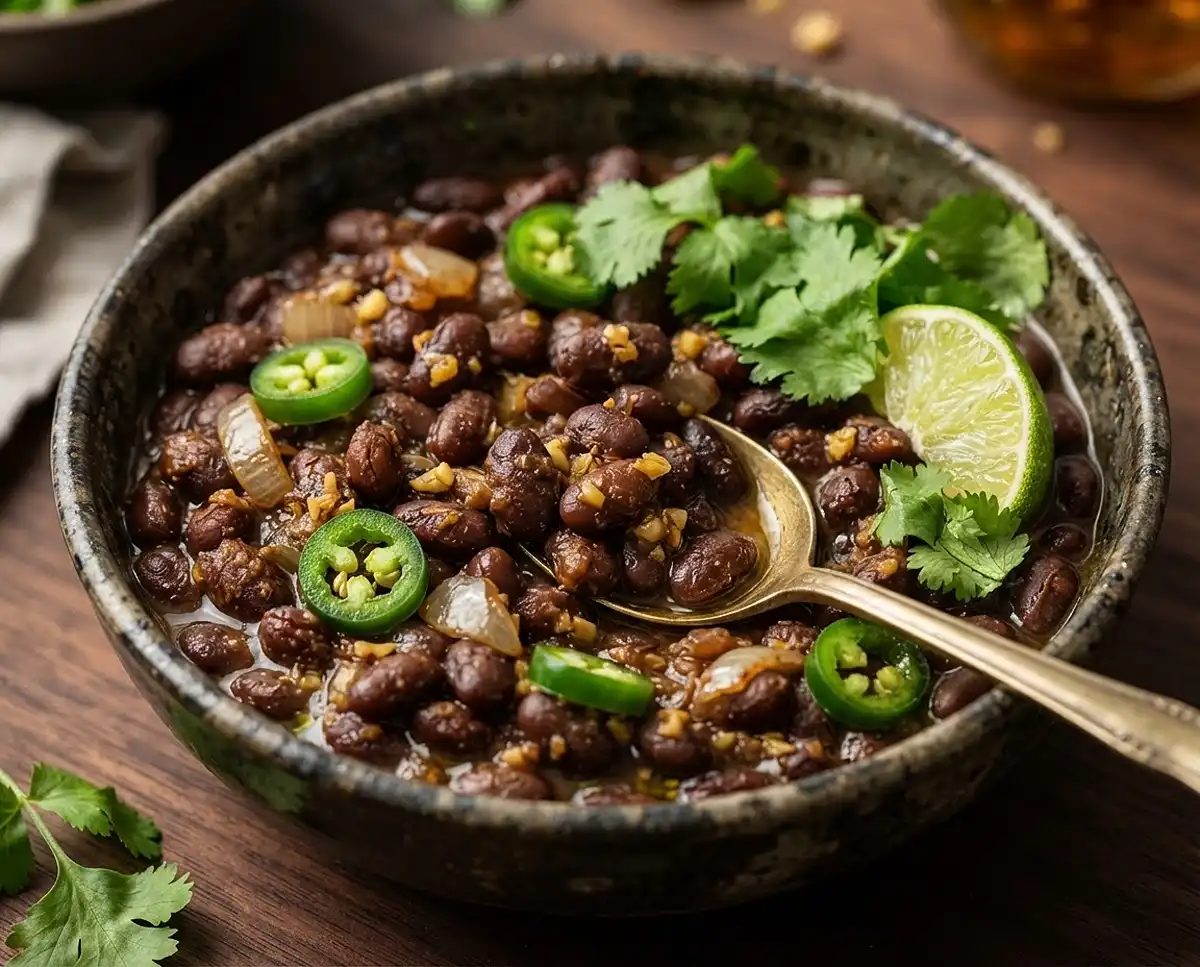
This isn’t just opening a can and microwaving it. We’re talking caramelized onions, toasted spices, and jalapeños that bring just enough kick. The result? Creamy, deeply flavored beans that taste like they simmered all day.
Table of Contents
Quick Recipe Snapshot
This is a fast stovetop recipe that turns canned black beans into something restaurant-worthy. You’ll sauté aromatics, toast warm spices, then simmer everything together until the beans are thick and creamy. The whole process takes about 15 minutes from start to finish, and you probably have most of the ingredients already.
Why You’ll Love This Recipe
Let me count the ways. First, it’s insanely quick but tastes like you put in real effort. Second, it uses ingredients you probably already have, so no special shopping trip required. Third, these beans are versatile enough to serve with literally anything.
They’re perfect as a taco filling, incredible alongside rice, amazing with scrambled eggs for breakfast, or just eaten straight from the pot with a spoon when no one’s looking. The spices create this warm, earthy flavor that makes the beans taste homemade, not canned.
Plus, if you’re feeding picky eaters or trying to get more plant-based meals into your rotation, these beans are a total win. They’re comforting, filling, and satisfying in a way that plain beans just aren’t.
Black Beans Canned
Ingredients
Ingredients
- 2 tablespoons olive oil
- ½ white onion chopped
- 2 jalapeños chopped (seeds removed if you’d like it less spicy)
- 3 cloves of garlic minced
- 1 ½ teaspoons ground cumin
- 2 teaspoons chili powder
- 1 teaspoon ground coriander
- 1 teaspoon dried oregano
- 1 15- ounce can black beans
Instructions
- Heat oil. Heat oil in a medium saucepan over medium-high heat.
- Sauté vegetables. Add onions and jalapeños and season with salt. Let cook, stirring occasionally, until starting to brown.
- Add garlic and spices. Add garlic, cumin, chili powder, coriander, and dried oregano. Cook, stirring to toast the spices 1 minute more.
- Add black beans. Add black beans, juice and all, and bring to a simmer. Simmer about 5 minutes. Mash a bit with a potato masher to make them nice and creamy. You don’t want to make a puree, just break some up to thicken the beans.
- Enjoy! Serve as a side or as a main meal with rice or with eggs and tortillas for breakfast.
Ingredients for Black Beans Canned
The beauty of this recipe is how few ingredients you need, and most of them are probably sitting in your pantry right now. We’re building layers of flavor with aromatics, heat, and a blend of warm spices that work magic together.
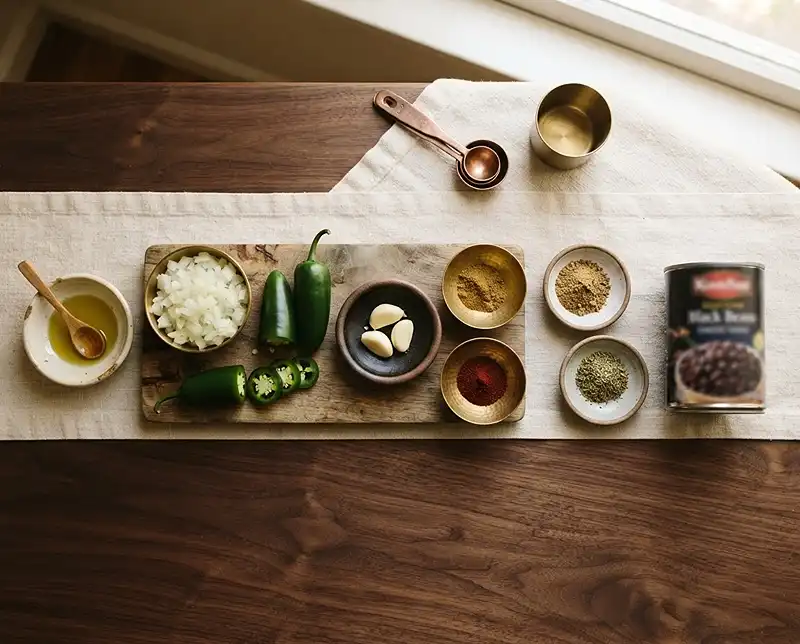
| Ingredient | Amount | Notes |
|---|---|---|
| Olive oil | 2 tablespoons | For sautéing the aromatics |
| White onion | 1/2, chopped | Yellow onion works too |
| Jalapeños | 2, chopped | Remove seeds for less heat |
| Garlic | 3 cloves, minced | Fresh is best here |
| Ground cumin | 1 1/2 teaspoons | Essential for that earthy flavor |
| Chili powder | 2 teaspoons | Adds warmth and depth |
| Ground coriander | 1 teaspoon | Bright, citrusy note |
| Dried oregano | 1 teaspoon | Mexican oregano if you have it |
| Black beans | 1 15-ounce can | Don’t drain! Use the liquid |
| Salt | To taste | Season as you go |
A quick note on the jalapeños: if you’re spice-sensitive, absolutely remove those seeds and membranes. That’s where most of the heat lives. I usually leave half the seeds in one jalapeño and remove them completely from the other, which gives a nice warmth without making anyone cry.
And about those bean juices: don’t drain that can! That starchy liquid is liquid gold. It’s what makes these beans turn wonderfully creamy when you mash some of them. According to the USDA, the liquid from canned beans is perfectly safe and nutritious, so there’s no reason to toss it.
Instructions for Making the Best Ever Canned Black Beans
This method is all about building flavor in layers. We’re starting with aromatics, toasting the spices to wake them up, then letting everything simmer together so the flavors can meld. The final mashing step is what transforms these from good to absolutely incredible.
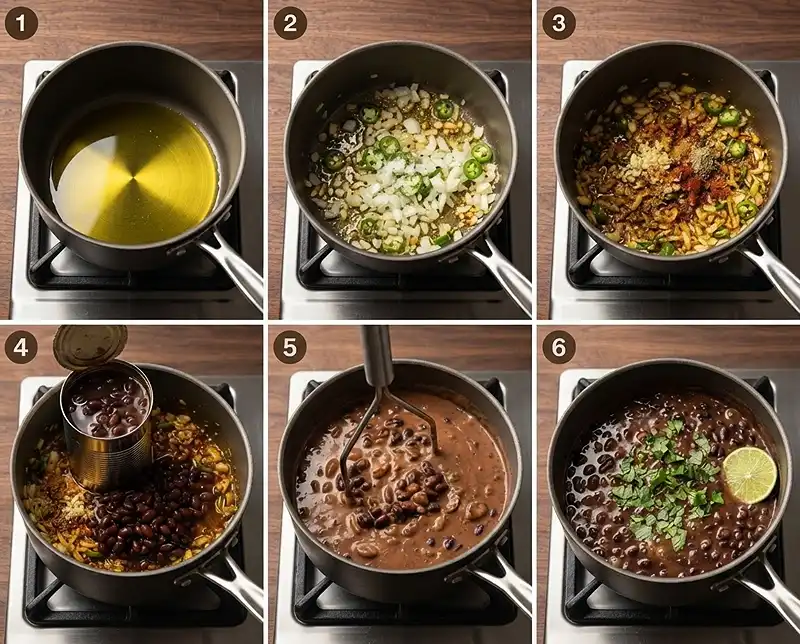
- Heat the oil. Pour the olive oil into a medium saucepan and set it over medium-high heat. Give it about a minute to get nice and hot. You’ll know it’s ready when the oil shimmers and moves easily across the pan.
- Sauté the vegetables. Toss in your chopped onion and jalapeños, then season with a good pinch of salt. The salt helps draw out moisture and speeds up the browning. Stir occasionally and let them cook for about 5 to 7 minutes. You want the onions to soften and start getting those golden-brown edges. That caramelization is where tons of flavor comes from, so don’t rush this step.
- Add the garlic and spices. Stir in the minced garlic, cumin, chili powder, coriander, and dried oregano. Keep stirring constantly for about a minute. You’ll smell the spices bloom and become incredibly fragrant. This toasting step is crucial because it brings out the essential oils in the spices and makes them taste fuller and more complex. If you skip it, the spices can taste flat or even a bit raw.
- Add the black beans canned with their liquid. Pour in the entire can of black beans, juice and all. Stir everything together and bring it to a gentle simmer. Let it bubble away for about 5 minutes. The beans will absorb some of that flavor from the aromatics and spices, and the liquid will start to thicken slightly.
- Mash for creaminess. Grab a potato masher or the back of a wooden spoon and gently mash about a third to half of the beans. You’re not making refried beans here, so don’t go overboard. You just want to break up enough beans to release their starch and make the whole pot thick and creamy. The texture should be somewhere between soupy and chunky, with plenty of whole beans still visible.
- Taste and adjust. This is the most important step. Taste your beans and add more salt if needed. Sometimes canned beans can be pretty bland, so they might need a generous amount. If you want more heat, add a pinch of cayenne. If they taste a little flat, a squeeze of lime juice can brighten everything up beautifully.
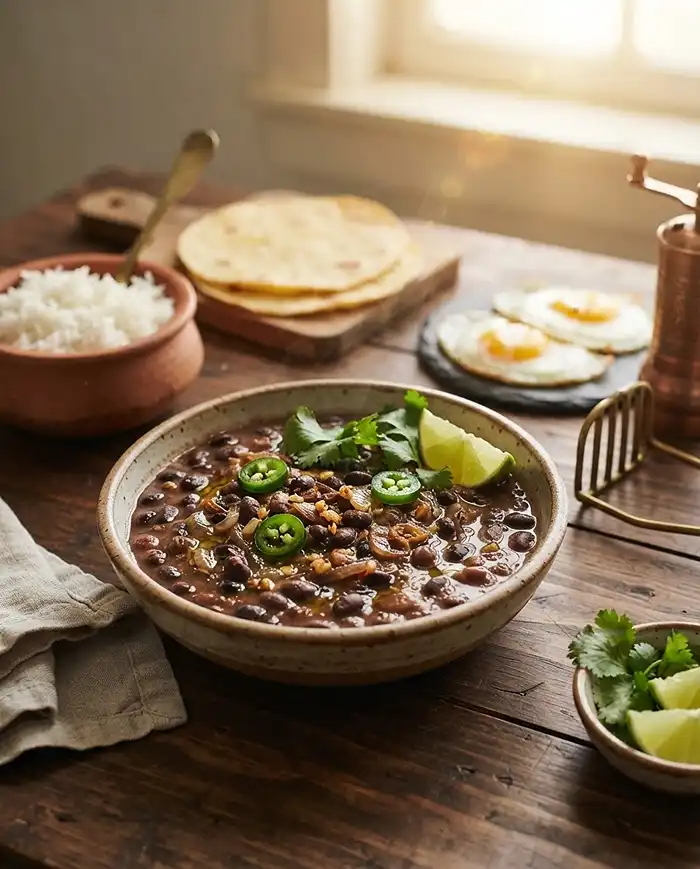
- Serve and enjoy! Spoon these beauties into bowls as a side dish, pile them onto tacos, serve them over rice, or enjoy them with scrambled eggs and warm tortillas for an amazing breakfast. They’re good however you eat them.
Expert Tips for Perfect Black Beans
After making this recipe more times than I can count, I’ve picked up a few tricks that make a real difference.
Don’t skip the browning. Letting those onions and jalapeños actually caramelize instead of just softening makes a huge flavor difference. You want to see some golden-brown bits forming on the bottom of the pan. Those are flavor bombs.
Toast your spices properly. When you add the spices, keep them moving in the pan. If they sit still, they can burn quickly and turn bitter. You want them fragrant, not scorched. About 60 seconds is perfect.
Use the bean liquid. I know I mentioned this already, but it’s worth repeating. That liquid is what makes these beans creamy without adding any cream or extra fat. It’s basically free flavor and texture.
Mash to your preference. Some people like their beans super creamy, others want them chunkier. Do what makes you happy. I usually mash about half, which gives a nice balance.
Let them rest. If you have an extra five minutes, let the beans sit off the heat before serving. They’ll thicken up even more and the flavors will continue to meld together.
Variations to Try
Once you’ve made the basic recipe a few times, it’s fun to mix things up. Here are some variations I love.
Smoky beans: Add a teaspoon of smoked paprika with the other spices, or stir in a chopped chipotle pepper in adobo sauce. The smokiness is incredible.
Extra creamy: Stir in a couple tablespoons of sour cream or Mexican crema at the end. This makes them rich and tangy.
With bacon: Cook a few strips of bacon first, then use the bacon fat instead of olive oil. Crumble the bacon and stir it back in at the end. Not vegetarian anymore, but absolutely delicious.
Citrus kick: Add the zest of one lime along with the spices, then finish with lime juice. The brightness really makes the flavors pop.
Tomato-based: Stir in half a cup of salsa or diced tomatoes when you add the beans. This makes them saucier and adds another layer of flavor.
With greens: Stir in a couple handfuls of fresh spinach or kale right at the end. They’ll wilt into the hot beans and add nutrition and color.
Troubleshooting Common Issues
Even simple recipes can go sideways sometimes. Here’s how to fix the most common problems.
Beans are too watery: Just let them simmer longer uncovered. The liquid will evaporate and they’ll thicken up. You can also mash a few more beans to release more starch.
Beans are too thick: Add a splash of water or vegetable broth and stir. Easy fix. You can always thin them out.
Too spicy: Stir in a spoonful of sour cream or Greek yogurt to cool things down. A squeeze of lime juice can also help balance the heat.
Not spicy enough: Add a pinch of cayenne pepper or a dash of hot sauce. Taste as you go so you don’t overdo it.
Tastes bland: You probably need more salt. Canned beans can be surprisingly bland, and salt is what makes all the other flavors come alive. Add it a pinch at a time and taste after each addition.
Spices taste raw or dusty: You didn’t toast them long enough. Next time, make sure they’re really fragrant before adding the beans.
Onions or garlic burned: Your heat was too high. Medium to medium-high is usually right, but every stove is different. If things are browning too fast, just turn it down a bit.
Storage Tips for Black Beans Canned
The good news is these beans store beautifully, so you can make a double batch and have easy meals ready to go all week. They actually taste even better the next day after the flavors have had time to hang out together.
| Storage Method | Duration | Best Practices |
|---|---|---|
| Refrigerator | 4-5 days | Store in an airtight container; reheat gently on stovetop or microwave |
| Freezer | 3 months | Use freezer-safe containers or bags; leave headspace for expansion |
| Room temperature | 2 hours max | Don’t leave out longer according to food safety guidelines |
When reheating from the fridge, I usually add a splash of water because the beans will have thickened up overnight. Just warm them gently over medium-low heat, stirring occasionally. Microwaving works fine too, just do it in 30-second intervals and stir between each one so they heat evenly.
For freezing, I like to portion them into individual servings so I can thaw exactly what I need. Those freezer-safe glass containers with locking lids work great. According to the FDA’s food safety guidelines, cooked beans freeze beautifully and retain their quality for up to three months.
To thaw, either move them to the fridge the night before or reheat from frozen over low heat with a bit of extra liquid. They might look a little separated when they thaw, but just stir them up and they’ll come back together.
Black Beans Canned FAQs
Do I need to rinse canned black beans before using them?
Yes, it is recommended to rinse canned black beans under cold water in a colander before using them. Rinsing removes excess sodium and the thick liquid from the can, which can reduce sodium content by up to 40%. It also helps improve the taste and texture of the beans in your recipes.
How long do canned black beans last once opened?
Once opened, canned black beans should be transferred to an airtight container and stored in the refrigerator. They will stay fresh for 3 to 4 days when properly refrigerated. If you need to store them longer, you can freeze them for up to 2 months in a freezer-safe container.
Are canned black beans as nutritious as dried black beans?
Canned black beans are nearly as nutritious as dried beans. They are an excellent source of protein, fiber, iron, and folate. The main difference is that canned beans typically contain added sodium for preservation. However, rinsing them can significantly reduce the sodium content while maintaining most of their nutritional value.
Can I use canned black beans straight from the can without cooking?
Yes, canned black beans are already fully cooked and safe to eat straight from the can. You can add them cold to salads or heat them for use in hot dishes like soups, tacos, or burritos. Simply drain and rinse them if desired, and they are ready to use immediately.
What is the shelf life of unopened canned black beans?
Unopened canned black beans typically have a shelf life of 2 to 5 years when stored in a cool, dry place. Always check the best-by date on the can for guidance. As long as the can is not damaged, dented, or bulging, the beans are generally safe to consume even slightly past the printed date, though quality may gradually decline.
Time to Make These Beans Your Own
I really hope you give this recipe a try because it’s honestly become one of my kitchen staples. Once you see how easy it is to turn black beans canned into something this flavorful, you’ll never go back to plain beans again.
The beauty of this recipe is that it’s flexible enough to adapt to whatever you have on hand or whatever mood you’re in. Want them smokier? Add chipotle. Craving something creamy? Stir in some sour cream. Need them vegetarian? They already are. Want bacon? Go for it.
If you’re in the mood for something sweet after these savory beans, my peach and blackberry crisp is the perfect summertime dessert.
Make these beans, take a picture, and let me know what you think. Did you keep them simple or did you try one of the variations? I love hearing how recipes turn out in your kitchen. Happy cooking!