Cottage Cheese Bread Wrap Recipe
This cottage cheese bread wrap recipe turns creamy cottage cheese into a crispy, protein-packed flatbread that holds your favorite fillings without falling apart. It’s naturally gluten-free, easy to make, and absolutely delicious.
I stumbled onto this cottage cheese wrap idea when I was trying to find a high-protein alternative to regular tortillas, and I’ve been making them at least once a week ever since. There’s something magical about watching cottage cheese transform into a sturdy, golden flatbread in the oven—it feels like a little kitchen science experiment that actually tastes amazing. Today I’m sharing my absolute favorite way to enjoy this wrap: stuffed with tender seasoned chicken and tangy Caesar salad.
The beauty of this recipe is that the wrap itself is incredibly simple—just cottage cheese and Parmesan—but it bakes up into something that actually holds together and has a satisfying texture. No weird aftertaste, no crumbling into a million pieces when you try to roll it.
Table of Contents
Why You’ll Love This Cottage Cheese Bread Wrap Recipe
There’s a whole world of cottage cheese wraps waiting for you over at the Cottage Cheese Wraps collection. Each one is made with the same love and attention, and they’re all absolutely worth trying. Happy cooking!
This cottage cheese bread wrap recipe checks so many boxes. First off, each wrap delivers about 20 grams of protein just from the flatbread itself, which makes it perfect for those days when you want a filling meal that doesn’t leave you hungry an hour later.
It’s also naturally gluten-free without any weird flour substitutes or complicated techniques. If you’ve ever tried making other low-carb wraps that turn out rubbery or tasteless, you’ll appreciate how this one actually has flavor and structure.
The prep is straightforward enough for a weeknight but impressive enough that you’ll want to make it when you’re meal prepping for the week. I love that the flatbread bakes while I’m cooking the chicken, so everything comes together in about 30 minutes total.
And honestly? It just tastes good. The Parmesan adds a nutty, salty edge to the cottage cheese, and once it’s baked, you get these slightly crispy edges with a tender middle that works perfectly with juicy chicken and crunchy romaine.

Cottage Cheese Bread Wrap Recipe
Ingredients
Ingredients
- 1 cup low fat cottage cheese or full fat; do not use fat free
- 3 tablespoons grated Parmesan cheese
- oil or nonstick spray
- 1 chicken breast lightly pounded into an even thickness
- ½ tablespoon olive oil
- 1 teaspoon paprika
- ¼ teaspoon garlic powder
- ¼ teaspoon kosher salt
- Pinch ground black pepper
- 2 cups chopped romaine
- 3 tablespoons Caesar Dressing more to taste
- 2 tablespoons grated Parmesan
Instructions
- Make the flatbread: Preheat the oven to 400°F and line a baking sheet with parchment paper. Brush the paper with oil or coat generously with nonstick spray. Spread the cottage cheese into an even layer creating a flatbread shape. Sprinkle with 3 tablespoons Parmesan.
- Bake the cottage cheese wrap for 20 to 25 minutes, until golden and set. At 10-minutes, remove it from the oven. If the curds have spread out a lot, use a spatula to very gently scoot them closer together, then continue baking. Let cool completely, then loosen with a spatula and carefully peel off of the parchment.
- Make the chicken: Drizzing the chicken with the oil and sprinkle with the paprika, garlic powder, salt, and pepper, rubbing to coat it evenly. Air fry at 375°F, until the chicken reaches 165°F on an instant read thermometer (I remove mine at 155°F then let it come to temperature as it rests), about 8 minutes for small breast or all the way up to 14 for a larger breast. Let cool 5 minutes, then dice. (You can also bake in the oven at 425°F for 12 to 18 minutes depending upon the size of your breast.)
- In a bowl, toss together the chicken, romaine, 2 tablespoons Parmesan and the Caesar dressing.
- Pile half inside of the wrap, roll, and enjoy. Save the second half for a future wrap.
Ingredients for Cottage Cheese Bread Wrap
This recipe uses simple ingredients you probably already have on hand. The cottage cheese forms the base of your flatbread, while the chicken and Caesar salad create a classic filling that never gets old.
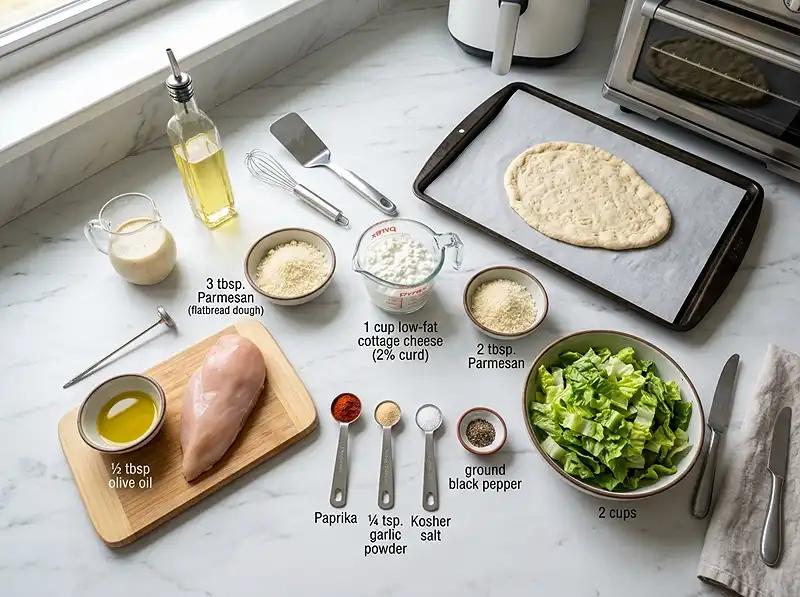
| Ingredient | Amount | Notes |
|---|---|---|
| Low fat cottage cheese | 1 cup | Full fat works too; avoid fat-free as it won’t set properly |
| Grated Parmesan cheese | 3 tablespoons (for wrap) + 2 tablespoons (for salad) | Use freshly grated for best flavor and melting |
| Oil or nonstick spray | For coating parchment | Essential to prevent sticking |
| Chicken breast | 1 breast | Pound to even thickness for consistent cooking |
| Olive oil | 1/2 tablespoon | For coating the chicken |
| Paprika | 1 teaspoon | Adds color and mild smoky flavor |
| Garlic powder | 1/4 teaspoon | Not garlic salt |
| Kosher salt | 1/4 teaspoon | Adjust to taste |
| Ground black pepper | Pinch | Freshly ground is best |
| Chopped romaine | 2 cups | Iceberg or mixed greens work too |
| Caesar dressing | 3 tablespoons | Use your favorite brand or homemade |
About the cottage cheese: The type of cottage cheese you use really matters here. Low-fat or full-fat both work beautifully because they have enough fat content to help the wrap hold together and develop a nice golden color as it bakes. Fat-free cottage cheese has too much moisture and not enough structure, so the wrap tends to stay soggy and never quite sets up properly. I usually grab whatever’s on sale between low-fat and full-fat—both give great results.
Parmesan is your secret weapon: The Parmesan isn’t just for flavor, though it definitely adds a delicious salty, nutty taste. It also helps create structure and those crispy edges that make this wrap so satisfying to bite into. Use the good stuff if you can—freshly grated Parmesan melts better and has more flavor than the pre-grated kind in the green can.
Step-by-Step Instructions for Cottage Cheese Wrap
Making this cottage cheese bread wrap recipe is easier than you might think. The key is spreading the cottage cheese evenly and letting it bake long enough to set completely before you try to peel it off the parchment.

- Prepare your baking sheet: Preheat your oven to 400°F and line a baking sheet with parchment paper. This is one of those times where you really want to be generous with the oil or nonstick spray—brush or spray the parchment thoroughly. I learned this the hard way when my first wrap stuck like crazy because I was too light-handed with the spray.
- Shape the flatbread: Spread the cottage cheese onto the prepared parchment in an even layer, forming a rectangular or oval shape about 1/4-inch thick. Think of it like making a really thick crepe—you want it uniform so it bakes evenly. Don’t worry if the edges aren’t perfect; they’ll crisp up and look rustic and delicious. Sprinkle the 3 tablespoons of Parmesan evenly over the top.
- Start baking: Slide the baking sheet into your preheated oven and bake for 20 to 25 minutes total. Set a timer for 10 minutes because you’ll need to check on it midway through.
- Mid-bake check: At the 10-minute mark, pull the pan out and take a look. Sometimes the cottage cheese curds will spread out as they heat up and release moisture. If this happens, use a spatula to very gently nudge the edges back toward the center, reforming your flatbread shape. Be gentle here—it’s not fully set yet, so you’re just coaxing it back together. Return it to the oven and continue baking until it’s golden brown and feels set when you gently press the center.
- Cool completely: This step requires patience, but it’s crucial. Let the wrap cool completely on the baking sheet. As it cools, it will firm up and become much easier to handle. Once cool, use a spatula to gently loosen the edges, then carefully peel the wrap off the parchment. If it’s still warm, it’ll tear, so resist the urge to rush this part.
- Season the chicken: While the wrap is baking (or while it cools), prepare your chicken. Drizzle the chicken breast with olive oil and sprinkle with paprika, garlic powder, salt, and pepper. Rub the seasonings all over to coat the chicken evenly. Pounding the chicken to an even thickness before seasoning helps it cook uniformly.
- Cook the chicken: Air fry the seasoned chicken at 375°F until it reaches 165°F on an instant-read thermometer. For a small breast, this usually takes about 8 minutes; larger breasts can take up to 14 minutes. I like to pull mine out at 155°F and let carryover cooking bring it to 165°F as it rests—this keeps it extra juicy. If you don’t have an air fryer, bake it in your oven at 425°F for 12 to 18 minutes, depending on size. Let the chicken rest for 5 minutes after cooking, then dice it into bite-sized pieces.
- Make the Caesar salad filling: In a medium bowl, toss together the diced chicken, chopped romaine, 2 tablespoons of Parmesan, and the Caesar dressing. Mix it all up until everything is nicely coated. Taste and add more dressing if you like things extra creamy.
- Assemble your wrap: Place your cooled cottage cheese flatbread on a clean work surface. Pile half of the chicken Caesar mixture onto the center of the wrap, leaving some space at the edges. Fold in the sides, then roll it up from the bottom like a burrito. The wrap should hold together nicely without tearing. Save the remaining chicken salad in the fridge for another wrap later—it’ll keep for a couple of days.
- Serve and enjoy: Slice your wrap in half if you want, or just dig right in. The combination of the tender flatbread, juicy seasoned chicken, crunchy lettuce, and tangy Caesar dressing is absolutely fantastic.
Expert Tips for Perfect Cottage Cheese Wraps
Don’t skip the cooling step. I know I mentioned this in the instructions, but it bears repeating because it’s the number one mistake people make. A warm cottage cheese wrap is fragile and will tear when you try to peel it off the parchment. A completely cooled wrap is sturdy and flexible. If you’re in a hurry, you can pop the whole baking sheet in the fridge for 10 minutes to speed things up.
Watch for the visual cues. Your wrap is ready when it’s golden brown across most of the surface and the edges have pulled away slightly from where they were. If it still looks pale and wet in spots, give it another few minutes. Underbaked wraps will be too soft and won’t hold up to filling.
Use parchment, not foil. I tried making this with aluminum foil once and it was a disaster—the wrap stuck terribly even with lots of oil. Parchment paper is non-negotiable for easy removal.
Customize the thickness. If you like a thinner, crispier wrap, spread your cottage cheese a bit thinner and reduce the baking time slightly. For a softer, more bread-like texture, keep it on the thicker side. I find about 1/4-inch gives the best balance between structure and tenderness.
Make multiple wraps at once. This recipe makes one large wrap, but you can easily double or triple the batch by using multiple baking sheets. The wraps store beautifully, so I often make three or four at once and keep them in the fridge for quick lunches throughout the week.
Rest your chicken. Letting the cooked chicken rest before dicing it isn’t just fancy chef talk—it actually keeps the juices inside the meat instead of all over your cutting board. Those five minutes make a real difference in how moist your filling turns out.
Delicious Variations
Once you’ve mastered the basic cottage cheese bread wrap recipe, there are endless ways to switch things up based on what you’re craving or what’s in your fridge.
Buffalo Chicken Wrap: Toss your cooked, diced chicken with buffalo sauce instead of Caesar dressing, then add shredded lettuce, diced tomatoes, and a drizzle of ranch or blue cheese dressing. The cool, creamy cottage cheese wrap is the perfect contrast to spicy buffalo chicken.
Mediterranean Style: Skip the chicken and fill your wrap with grilled vegetables, crumbled feta, olives, cucumbers, and a generous dollop of tzatziki sauce. This lighter version is perfect for lunch on a hot day.
Breakfast Wrap: Fill your cottage cheese wrap with scrambled eggs, crispy bacon or sausage, shredded cheese, and salsa. It’s like a breakfast burrito but with way more protein and fewer carbs. You might want to check out my easy tuna melt wrap recipe for more wrap inspiration.
Italian Herbs Flatbread: Mix dried Italian herbs (basil, oregano, thyme) into the cottage cheese before baking for an herb-infused wrap. This pairs beautifully with Italian-style fillings like marinara, mozzarella, and pepperoni for a pizza-wrap hybrid.
Tuna Salad Wrap: My high protein cottage cheese chicken salad works wonderfully in these wraps, and so does classic tuna salad for an even quicker lunch option.
Turkey Club: Layer sliced turkey, crispy bacon, lettuce, tomato, and mayo or avocado for a high-protein take on the classic club sandwich.
Troubleshooting Common Issues
My wrap won’t hold together—it’s too crumbly. This usually means it needed more baking time or the cottage cheese was fat-free. Make sure you’re using low-fat or full-fat cottage cheese, and bake until the wrap is deeply golden and feels firm to the touch. It should spring back slightly when you press the center.
The wrap stuck to the parchment and tore when I tried to remove it. Two likely culprits: not enough oil or spray on the parchment, or trying to remove it while still warm. Make sure you’re generous with the oil, and always let the wrap cool completely. A fully cooled wrap should peel off easily with minimal coaxing.
My cottage cheese spread out too thin during baking. Some brands of cottage cheese are wetter than others. Next time, you can drain your cottage cheese slightly by placing it in a fine-mesh strainer for a few minutes before spreading it. Also, don’t forget that mid-bake check at 10 minutes—you can reshape it then if needed.
The edges burned before the center was done. Your oven might run a bit hot, or the wrap might have been spread unevenly with thinner edges. Try dropping the temperature to 375°F and baking a bit longer, and make sure your cottage cheese layer is as uniform as possible.
The wrap tastes too “cottage cheese-y.” If you’re sensitive to the cottage cheese flavor, increase the Parmesan to 4 or even 5 tablespoons. The extra cheese adds more savory, salty flavor that masks the dairy taste. You can also try mixing in herbs or spices before baking.
My chicken is dry. Overcooking is usually the problem. Invest in an instant-read thermometer if you don’t have one—it’s a game-changer for perfectly cooked chicken every time. Remove the chicken at 155-160°F and let it coast to 165°F as it rests. Also make sure you’re not using massive chicken breasts, or pound them thinner so they cook more quickly and evenly.
Storage and Meal Prep
One of my favorite things about this cottage cheese bread wrap recipe is how well it meal preps. The wraps themselves store beautifully, and you can make both the flatbread and the filling ahead of time for super-quick assembly during the week.

| Storage Method | Duration | Instructions |
|---|---|---|
| Refrigerator (baked wraps) | 4-5 days | Stack cooled wraps with parchment paper between each one, store in an airtight container or zip-top bag |
| Refrigerator (assembled wraps) | 1-2 days | Wrap tightly in plastic wrap or foil; best eaten within 24 hours as lettuce may wilt |
| Freezer (baked wraps only) | 1-2 months | Separate with parchment, freeze in airtight container; thaw overnight in fridge before filling |
| Chicken filling (separate) | 3-4 days | Store in airtight container; assemble wraps fresh when ready to eat |
For best results with meal prep: I recommend making several flatbreads at once and storing them plain in the fridge or freezer. Keep your chicken Caesar salad (or whatever filling you’re using) in a separate container. When you’re ready to eat, just pull out a wrap and the filling, assemble, and you’ve got lunch ready in under a minute.
If you do assemble the wraps ahead of time, wrap them very tightly in plastic wrap to prevent the filling from making the bread soggy. Even so, the texture is best when assembled fresh. The lettuce tends to release moisture over time, which can soften the wrap.
Reheating tips: If you want a warm wrap, heat it gently in a dry skillet over medium heat for a minute or two on each side, or pop it in the microwave for 20-30 seconds. The microwave will soften it more than a skillet, so choose based on whether you want it tender or slightly crispy.
According to the USDA guidelines on food storage, cooked chicken should be consumed within 3-4 days when refrigerated at 40°F or below, so plan your meal prep accordingly.
Cottage Cheese Bread Wrap Recipe FAQs
What is cottage cheese bread wrap and how do you make it?
Cottage cheese bread wrap is a high-protein, low-carb flatbread alternative made primarily from cottage cheese and eggs. To make it, blend cottage cheese until smooth, mix with eggs and seasonings, spread the mixture thinly on a baking sheet, and bake until set and slightly golden. The result is a flexible, tortilla-like wrap that can be filled with your favorite ingredients.
Can I make cottage cheese bread wraps without eggs?
While eggs are a key binding ingredient in cottage cheese bread wraps, you can substitute them with flax eggs or chia eggs for a vegan version. Mix one tablespoon of ground flaxseed or chia seeds with three tablespoons of water per egg and let it sit for a few minutes to thicken. Keep in mind that the texture may be slightly different from the original recipe.
How do I store cottage cheese bread wraps and how long do they last?
Store cottage cheese bread wraps in an airtight container in the refrigerator for up to 3-4 days. Place parchment paper between each wrap to prevent them from sticking together. You can also freeze them for up to 2 months. To reheat, warm them in a dry skillet for a few seconds on each side or microwave briefly until pliable.
Why are my cottage cheese bread wraps too soft or not holding together?
If your wraps are too soft, you may need to bake them longer until they’re fully set and the edges start to turn golden. Make sure to spread the mixture thinly and evenly on the baking sheet. Also, ensure you’ve blended the cottage cheese well and used the right ratio of cottage cheese to eggs. Too much moisture or not enough baking time are the most common causes of wraps that don’t hold together.
What are some filling ideas for cottage cheese bread wraps?
Cottage cheese bread wraps are versatile and work with both savory and sweet fillings. For savory options, try turkey and vegetables, scrambled eggs with cheese, grilled chicken with lettuce and tomato, or hummus with roasted vegetables. For sweet versions, spread with nut butter and banana, cream cheese with berries, or cinnamon and honey. They work well as breakfast wraps, lunch sandwiches, or light dinner options.
Let’s Wrap This Up
This cottage cheese bread wrap recipe has become one of my go-to lunches because it checks all the boxes: high protein, low carb, easy to make, and genuinely delicious. There’s something really satisfying about turning something as simple as cottage cheese into a wrap that actually holds together and tastes amazing.
Whether you’re following a specific diet plan or just looking for a lighter alternative to regular wraps, this recipe delivers. The Caesar chicken version I shared today is my absolute favorite, but I love that you can fill these wraps with just about anything your heart desires.
Give this cottage cheese wrap a try this week and let me know what you think! And if you’re looking for more creative ways to use everyday ingredients, check out my double chocolate strawberry banana bread recipe for a sweet treat that’s just as surprisingly delicious.
What fillings will you try in your cottage cheese wraps? I’d love to hear your favorite combinations!