Whole Wheat Breadsticks Recipe
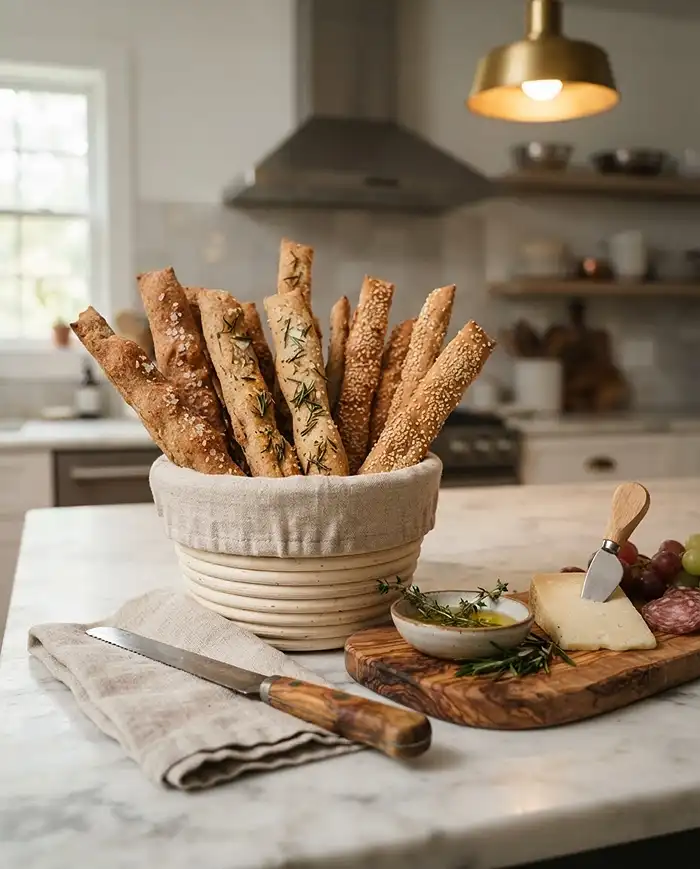
This whole wheat breadsticks recipe delivers crispy, flavorful breadsticks made with wholesome ingredients that taste better than any restaurant version—and they’re surprisingly easy to make at home.
I’ve been making these homemade whole wheat breadsticks for years, and they never fail to disappear within minutes. There’s something incredibly satisfying about pulling warm, golden breadsticks from the oven, brushing them with olive oil, and watching everyone reach for seconds.
Whether you’re serving them with pasta, soup, or just a bowl of marinara for dipping, these breadsticks hit the spot every single time.
Table of Contents
Quick Recipe Snapshot
These healthy breadstick recipe beauties come together with simple pantry ingredients and a little patience while the dough rises. You’ll get about 24-30 breadsticks depending on how thick you cut them, and the whole process takes about 2 hours from start to finish—most of that is hands-off rising time.
The combination of whole wheat and all-purpose flour gives you that nutty, hearty flavor without making them too dense or heavy. They bake up crispy on the outside with just a bit of chew on the inside.
Why You’ll Love This Whole Wheat Breadsticks Recipe
First off, these whole grain breadsticks are healthier than the white-flour versions you’d get at a chain restaurant, but they don’t taste “healthy” in that disappointing cardboard way. The whole wheat adds genuine flavor and a lovely texture.
They’re also incredibly versatile. You can top them with whatever you’re craving—garlic and herbs for Italian night, sesame seeds for an Asian-inspired meal, or just coarse salt for a simple classic. I’ve made them dozens of ways, and they always turn out great.
Plus, the dough is forgiving. If you’re nervous about yeast baking, this recipe is a wonderful place to start. The dough tells you what it needs, and you’ll get better at reading it with each batch.
And honestly? Your kitchen will smell absolutely amazing while these bake. That’s reason enough right there.

Whole Wheat Breadsticks Recipe
Ingredients
Ingredients
- 1 ½ cups warm water 105-115°F
- 2 ¼ teaspoons active dry yeast 1 packet
- 1 tablespoon honey or maple syrup
- 1 teaspoon salt
- 2 cups whole wheat flour
- 1 ½ – 2 cups all-purpose flour
- 2 tablespoons olive oil plus more for brushing
- Optional toppings: garlic powder dried herbs (rosemary, oregano), sesame seeds, poppy seeds, coarse sea salt
Instructions
- In a large bowl, combine the warm water, yeast, and honey. Let sit for 5-10 minutes until the yeast is foamy.
- Stir in the salt and whole wheat flour. Gradually add the all-purpose flour, ½ cup at a time, mixing until a shaggy dough forms.
- Turn the dough out onto a lightly floured surface and knead for 5-7 minutes, until smooth and elastic. If the dough is too sticky, add a little more all-purpose flour.
- Lightly grease a clean bowl with olive oil. Place the dough in the bowl, turning to coat. Cover with plastic wrap or a clean kitchen towel and let rise in a warm place for 1-1.5 hours, or until doubled in size.
- Preheat your oven to 400°F (200°C). Line a baking sheet with parchment paper.
- Gently punch down the dough to release the air. Divide the dough into two equal pieces. Roll each piece into a rectangle, about 1/4 to 1/2 inch thick.
- Using a pizza cutter or sharp knife, cut the dough into strips about ½ inch wide and 8-10 inches long.
- Place the breadsticks on the prepared baking sheet, leaving a little space between them.
- Brush the breadsticks lightly with olive oil and sprinkle with your desired toppings (garlic powder, herbs, seeds, salt).
- Bake for 12-18 minutes, or until golden brown and crisp.
- Let cool slightly on a wire rack before serving.
Notes
Ingredients You’ll Need
This recipe uses straightforward ingredients you probably already have. The yeast needs to be active dry—not instant—because we’re proofing it first to make sure it’s alive and ready to work. The honey feeds the yeast and adds just a whisper of sweetness that balances the earthy whole wheat.

| Ingredient | Amount | Notes |
|---|---|---|
| Warm water | 1 ½ cups | 105-115°F—warm to the touch but not hot |
| Active dry yeast | 2 ¼ teaspoons | One standard packet |
| Honey or maple syrup | 1 tablespoon | Feeds the yeast, adds subtle sweetness |
| Salt | 1 teaspoon | Essential for flavor |
| Whole wheat flour | 2 cups | Regular or white whole wheat both work |
| All-purpose flour | 1 ½ – 2 cups | Amount varies based on humidity |
| Olive oil | 2 tablespoons plus more | For dough and brushing |
| Optional toppings | As desired | Garlic powder, herbs, seeds, coarse salt |
The flour ratio matters here. Using all whole wheat makes the breadsticks too dense and hard to work with. The all-purpose flour lightens things up while still keeping that wholesome whole grain flavor front and center.
Water temperature is important too. If it’s too hot, you’ll kill the yeast. Too cold, and the yeast won’t activate. I usually test it on my wrist—it should feel like warm bathwater, comfortable and soothing.
Step-by-Step Instructions
These easy whole wheat breadsticks come together in stages, but none of the steps are difficult. The key is giving the dough time to rise properly—that’s where the flavor and texture develop.

- Proof the yeast: In a large bowl, combine the warm water, yeast, and honey. Let this mixture sit for 5-10 minutes until the yeast is foamy and bubbly on top. This step confirms your yeast is active and alive. If nothing happens after 10 minutes, your yeast might be expired or your water was too hot.
- Mix the dough: Stir in the salt and whole wheat flour until combined. Then gradually add the all-purpose flour, about ½ cup at a time, mixing with a wooden spoon or your hands until a shaggy dough forms. It’ll look rough and uneven at this stage—that’s perfect.
- Knead the dough: Turn the dough out onto a lightly floured surface and knead for 5-7 minutes until it becomes smooth and elastic. You’ll feel the texture change under your hands as the gluten develops. If the dough sticks to your hands or the counter, sprinkle on a bit more all-purpose flour, but don’t go overboard.
- First rise: Lightly grease a clean bowl with olive oil and place the dough in it, turning once to coat all sides. Cover with plastic wrap or a clean kitchen towel and let it rise in a warm, draft-free spot for 1 to 1.5 hours, or until doubled in size. I usually put mine in the oven with just the light on—it creates the perfect warm environment.
- Preheat the oven: While the dough finishes rising, preheat your oven to 400°F (200°C) and line a large baking sheet with parchment paper. You might need two baking sheets depending on how many breadsticks you’re making.
- Shape the dough: Gently punch down the risen dough to release the air bubbles. Divide it into two equal pieces for easier handling. Roll each piece into a rectangle about ¼ to ½ inch thick—thinner breadsticks will be crispier, thicker ones will have more chew.
- Cut the breadsticks: Using a pizza cutter or sharp knife, cut the dough into strips about ½ inch wide and 8-10 inches long. Don’t worry if they’re not perfectly uniform—rustic looks charming and they’ll all taste fantastic.
- Arrange on baking sheet: Place the breadsticks on your prepared baking sheet, leaving a little space between each one. They’ll puff up slightly as they bake, so give them room to breathe.
- Add toppings: Brush the breadsticks lightly with olive oil using a pastry brush, then sprinkle with your desired toppings. I love garlic powder and dried rosemary, but go with whatever sounds good to you. A sprinkle of coarse sea salt is always a winner.
- Bake: Bake for 12-18 minutes, or until the breadsticks are golden brown and crisp. The exact timing depends on how thick you cut them and how hot your oven runs. Start checking at 12 minutes—they can go from perfect to overdone quickly.
- Cool and serve: Let the breadsticks cool slightly on a wire rack before serving. They’re best enjoyed warm, when they’re at their absolute crispiest and most fragrant.
The whole process is pretty forgiving. Even if your breadsticks aren’t perfect, they’ll still taste homemade and delicious.
Expert Tips for Perfect Breadsticks
After making this whole wheat breadsticks recipe countless times, I’ve picked up a few tricks that make a real difference.
Don’t skip the yeast proofing step. Yes, you could use instant yeast and skip this, but proofing tells you definitively that your yeast is working. There’s nothing worse than going through the whole process only to end up with dense, flat breadsticks because your yeast was dead.
When kneading, you’re looking for the dough to pass the “windowpane test.” Tear off a small piece and gently stretch it between your fingers. If you can stretch it thin enough to see light through it without it tearing, the gluten is properly developed.
The first rise is crucial for flavor. Slower rises in cooler environments actually develop better flavor, so if you have time, let it rise in a cooler spot for longer rather than rushing it in a very warm place.
For the crispiest breadsticks, roll the dough thinner and bake them a bit longer. For softer, chewier breadsticks with more bread-like texture, roll them thicker and pull them from the oven when they’re just golden.
If you’re making a double batch, you can freeze half the dough after the first rise. Wrap it tightly in plastic wrap and then aluminum foil, and freeze for up to 3 months. Thaw it in the fridge overnight, then proceed with shaping and baking.
A pizza cutter really is the best tool for cutting breadsticks. It’s faster than a knife and gives you cleaner cuts without dragging the dough.
Delicious Variations to Try
Once you’ve mastered the basic recipe, the variations are endless. This is where you can really make these homemade whole wheat breadsticks your own.
For garlic parmesan breadsticks, brush them with melted butter mixed with minced garlic instead of olive oil, then sprinkle generously with grated parmesan before baking. They taste just like the ones from that pizza chain everyone loves.
Try everything bagel breadsticks by sprinkling them with everything bagel seasoning before baking. It’s an easy way to pack in tons of flavor with zero effort.
For herb garden breadsticks, add a tablespoon of chopped fresh herbs—rosemary, thyme, or basil—directly into the dough during mixing. The flavor gets baked right in and the flecks of green look beautiful.
Make cheesy breadsticks by sprinkling shredded mozzarella or cheddar on top during the last 5 minutes of baking. Let the cheese melt and get a bit bubbly and golden.
Want them spicy? Add red pepper flakes to the olive oil before brushing, or mix some cayenne into the dough itself for heat throughout.
You can also play with the flour ratio. Using white whole wheat flour instead of regular whole wheat gives you a milder, lighter flavor that’s perfect if you’re feeding picky eaters.
For more bread inspiration, check out this fluffy Japanese milk bread recipe or this Publix white mountain bread copycat.
Troubleshooting Common Issues
Even experienced bakers run into problems sometimes. Here’s how to fix the most common issues with this healthy breadstick recipe.
Problem: The dough won’t rise. This usually means the yeast was dead, the water was too hot and killed it, or the environment was too cold. Make sure your water is between 105-115°F, check your yeast’s expiration date, and find a warm spot for rising. According to the FDA’s safe food handling guidelines, yeast grows best in warm, moist environments around 75-85°F.
Problem: The breadsticks are too dense. You might have added too much flour or didn’t knead long enough. Whole wheat dough needs good gluten development. Make sure you’re kneading for the full 5-7 minutes and only adding flour as needed to prevent sticking.
Problem: They’re burning on the bottom but raw on top. Your oven might be running hot, or the baking sheet is too close to the heating element. Try moving the rack up one position and reducing the temperature by 25°F.
Problem: The breadsticks are tough and chewy, not crispy. They were likely rolled too thick or underbaked. Roll them thinner next time and bake a few minutes longer until they’re deeply golden.
Problem: The dough is too sticky to work with. Humidity affects flour absorption. Just add more all-purpose flour a tablespoon at a time until the dough is workable. It should be slightly tacky but not sticky.
Problem: They taste bland. Don’t skimp on the salt in the dough—it’s essential for flavor. Also make sure you’re adding plenty of toppings. A generous hand with garlic powder, herbs, and salt makes all the difference.
Storage and Make-Ahead Options
These whole grain breadsticks are definitely best the day they’re made, but you have options for storing and reheating them so nothing goes to waste.
| Storage Method | Duration | Best Practice |
|---|---|---|
| Room temperature | 2-3 days | Store in an airtight container or zip-top bag |
| Refrigerator | 5-7 days | Wrap tightly to prevent drying out |
| Freezer | 2-3 months | Flash freeze on a baking sheet, then transfer to freezer bag |
| Unbaked dough | 3 months frozen | Freeze after first rise, thaw in fridge overnight |
To reheat breadsticks and restore some crispiness, place them on a baking sheet in a 350°F oven for 5-7 minutes. The microwave will make them soft and chewy rather than crispy, so only use that if you don’t mind the texture change.
For freezing, I like to flash freeze them first by laying them out on a baking sheet until solid, then transferring to a freezer bag. This keeps them from sticking together so you can grab just a few at a time.
You can also freeze the shaped, unbaked breadsticks. Arrange them on a parchment-lined baking sheet and freeze until solid, then transfer to a freezer bag. Bake straight from frozen, adding a few extra minutes to the baking time.
The USDA recommends proper storage practices to maintain food quality and safety—make sure baked goods cool completely before storing to prevent moisture buildup that can lead to mold.
Whole Wheat Breadsticks Recipe FAQs
How do I make whole wheat breadsticks from scratch?
To make whole wheat breadsticks, combine whole wheat flour, yeast, warm water, salt, and a touch of honey or sugar. Knead the dough until smooth and elastic, let it rise for about an hour, then divide it into portions. Roll each portion into thin sticks, brush with olive oil or melted butter, add your favorite seasonings, and bake at 400°F for 12-15 minutes until golden brown.
Can I use all whole wheat flour or should I mix it with all-purpose flour?
You can use 100% whole wheat flour, but the breadsticks will be denser and have a heartier texture. For lighter, more tender breadsticks, try using a 50-50 blend of whole wheat and all-purpose flour. This combination gives you the nutritional benefits of whole wheat while maintaining a softer texture that many people prefer.
How long do homemade whole wheat breadsticks stay fresh?
Homemade whole wheat breadsticks stay fresh at room temperature for 2-3 days when stored in an airtight container or sealed plastic bag. For longer storage, you can freeze them for up to 3 months. To reheat, warm them in a 350°F oven for 5-7 minutes to restore their crispness.
What seasonings work best on whole wheat breadsticks?
Popular seasonings for whole wheat breadsticks include garlic powder, Italian seasoning, dried rosemary, sesame seeds, poppy seeds, grated Parmesan cheese, sea salt, or everything bagel seasoning. You can also brush them with garlic butter before baking for extra flavor. Mix and match seasonings to create your favorite combinations.
Why are my whole wheat breadsticks hard instead of soft?
Hard breadsticks usually result from overbaking, too much flour, or insufficient moisture in the dough. Make sure to measure flour correctly by spooning it into the measuring cup rather than scooping. Check your breadsticks a few minutes before the recommended baking time ends. Also, ensure your dough is soft and slightly sticky before the first rise, and avoid overworking it during kneading.
Enjoy Your Homemade Breadsticks
There’s something really special about serving warm, homemade whole wheat breadsticks that you made yourself. The kitchen smells incredible, everyone’s impressed, and honestly, they taste so much better than anything you’d buy at the store or get at a restaurant.
This whole wheat breadsticks recipe has become one of those reliable standards in my kitchen—the kind of recipe I turn to again and again because it just works. Whether you’re making them for a casual family dinner or a special occasion, they always deliver.
The best part? Once you’ve made them a couple times, you won’t even need to look at the recipe anymore. The process becomes second nature, and you can whip up a batch almost on autopilot.
Give this recipe a try this week. Start with the basic version, then experiment with different toppings and flavors until you find your favorite combination. Try these bread and butter pickles to serve alongside them.
Now get in that kitchen and make some breadsticks. Your family is going to love you for it.