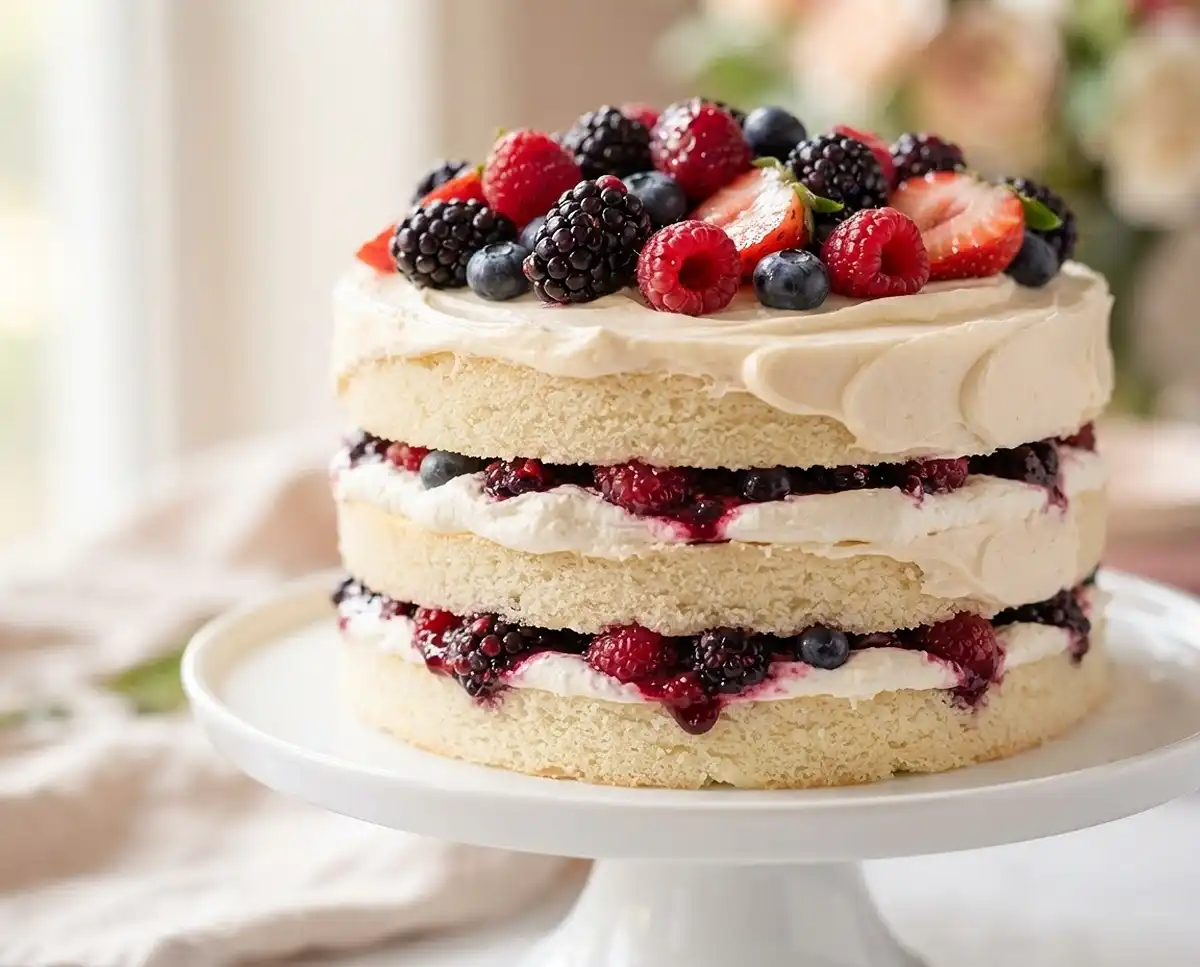
Berry Chantilly Cake Recipe
This berry chantilly cake recipe creates the most luscious, bakery-style layer cake you’ll ever make at home—tender vanilla cake, whipped mascarpone frosting, and fresh berries in every bite.
I still remember the first time I tasted a slice of berry chantilly cake at a bakery, and I knew I had to recreate it. After lots of testing (and a few frosting mishaps), I finally nailed it. This is one of those cakes that makes people stop mid-conversation and ask for the recipe.
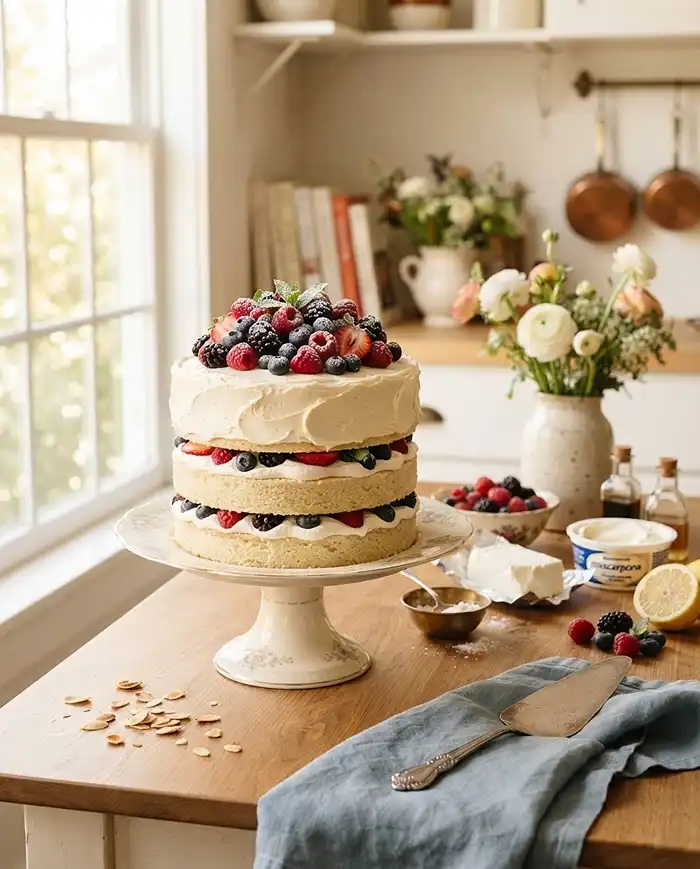
If you’re looking for a showstopper dessert that tastes as incredible as it looks, this Berry Chantilly Cake is it. It’s got three layers of soft vanilla almond cake, a silky cream cheese and mascarpone frosting that’s lighter than buttercream, and a homemade berry filling that’s jammy and bright. It’s fancy enough for birthdays and special occasions, but honestly, it’s worth making just because.
Table of Contents
Why You’ll Love This Berry Chantilly Cake Recipe
This isn’t your average layer cake. The texture is incredibly soft and moist, thanks to the reverse creaming method and the combination of butter and oil. The chantilly cream is what really sets it apart—it’s fluffy, tangy, and not too sweet, which balances perfectly with the berries.
You get real fruit flavor without relying on artificial extracts or fillings. The berry compote is thick enough to stay put between the layers but still tastes fresh and bright. And because you’re using fresh berries for decoration, every slice looks like it came from a high-end bakery.
It’s also surprisingly doable, even if you’re not a cake decorator. The frosting is forgiving, and the layers freeze beautifully, so you can break up the work over a couple of days. Plus, it feeds a crowd, which makes it perfect for gatherings.
Berry Chantilly Cake
Ingredients
Vanilla Cake
- 13 ounces bleached cake flour
- 13 ounces granulated sugar
- 3 teaspoon baking powder
- ¼ teaspoon baking soda
- ½ teaspoon salt
- 8 ounces unsalted butter softened
- 2 teaspoons vanilla extract
- 1 teaspoon almond extract
- 10 ounces whole milk room temperature
- 3 ounces vegetable oil
- 3 large eggs room temperature
Chantilly Cream
- 16 ounces cream cheese softened
- 8 ounces unsalted butter softened
- 8 ounces mascarpone cheese softened
- 22 ounces powdered sugar sifted
- 1 teaspoon almond extract
- 1 Tablespoon vanilla extract
- 16 ounces heavy whipping cream
Berry Filling
- 2 cups fresh or frozen berries
- 2.5 ounces sugar
- 1 ounces water
- 1 ounces cornstarch
- 2 teaspoons lemon juice
Decoration
- 2 cups fresh berries for decoration
Instructions
- — Vanilla Cake Instructions —
- Note: It’s VERY important that your cold ingredients are at room temperature or slightly warmed. See video for tips. Heat oven to 350º F/177º C.
- Prepare three 8-inch cake pans with cake goop or your preferred pan release.
- In a measuring cup, combine 4 ounces of the milk with the vegetable oil. Set aside.
- In a separate bowl, whisk together the remaining 6 ounces of milk, vanilla extract, almond extract, and room-temperature eggs until combined. Set aside.
- In the bowl of a stand mixer fitted with the paddle attachment, combine the cake flour, sugar, baking powder, baking soda, and salt. Mix on low for a few seconds to combine.
- With the mixer on the slowest speed, add the softened butter in small pieces and mix until the mixture resembles coarse sand.
- Add the milk and oil mixture all at once. Increase the mixer speed to medium (speed 4 on a KitchenAid) and mix for 2 full minutes to develop the cake’s structure. Do not skip this step.
- Reduce speed to low and add the egg and milk mixture in three batches, scraping the bowl between additions. Mix just until combined.
- Divide the batter evenly between the three prepared 8-inch pans. Bake for 25 to 35 minutes, or until a toothpick inserted in the center comes out clean.
- Immediately tap each pan once on the counter to release steam and prevent uneven shrinking.
- Let the cakes cool in the pans for 20 minutes, then turn them out onto a cooling rack. Wrap in plastic wrap and freeze for at least 1 hour before assembly.
- — Chantilly Cream Instructions —
- In a stand mixer with the paddle attachment, cream the softened butter, cream cheese, and mascarpone together until smooth and free of lumps.
- Add the sifted powdered sugar and continue mixing until creamy and fully incorporated.
- In a separate clean bowl with the whisk attachment, whip the heavy cream to soft peaks. Add the vanilla extract and almond extract. Peaks should be firm but not curdled. Watch closely, this happens quickly.
- Gently fold the whipped cream into the cream cheese mixture until just combined. Do not overmix.
- — Berry Cake Filling —
- Place the berries and sugar in a medium saucepan over medium heat. Bring to a simmer.
- In a small bowl, whisk the cornstarch with the cold water to make a slurry.
- Pour the slurry into the bubbling berries and add the lemon juice.
- Cook for 1 to 2 minutes, stirring, until the mixture is thick and glossy.
- Remove from heat and cool the filling completely before using. Spreading it on a sheet pan speeds up cooling.
- — Cake Assembly —
- Trim the tops of the chilled cake layers flat.
- Place the first cake layer on a cake board or serving plate.
- Spread cooled berry filling on top of the cake layer.
- Spread a layer of chantilly cream over the berry filling.
- Scatter fresh berries on top of the cream.
- Add the second cake layer and repeat the berry filling, cream, and fresh berry steps.
- Top with the third cake layer. Apply a thin coat of frosting and freeze for 15 minutes.
- Frost the outside of the cake with the remaining chantilly cream. Smooth the sides with a bench scraper.
- Top the cake with a generous pile of fresh berries.
- Chill the assembled cake for at least 30 minutes before slicing. Serve cold or let sit at room temperature for 15 to 20 minutes for the best flavor.
Ingredients for Berry Chantilly Cake Recipe
This recipe has three main components: the vanilla cake layers, the chantilly cream frosting, and the berry filling. Each one plays an important role, so let’s talk about what you’ll need and why it matters.
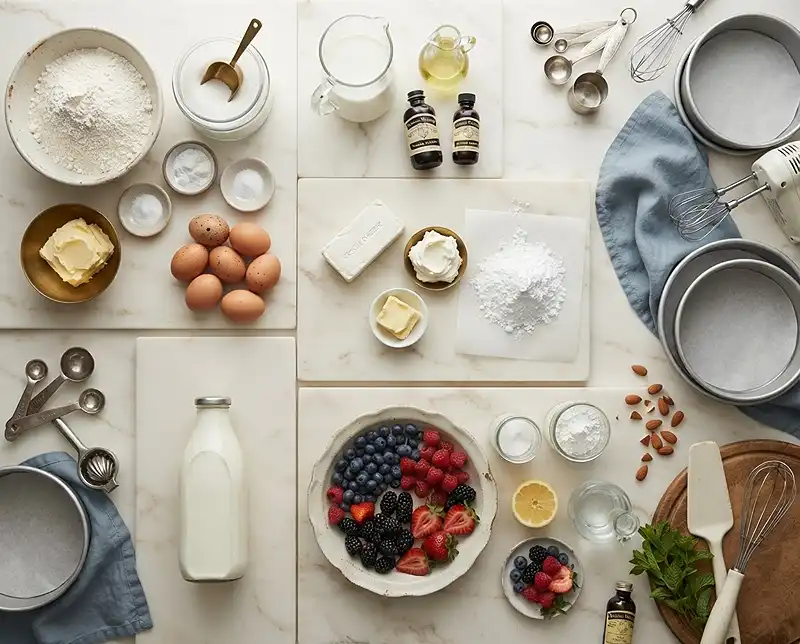
| Ingredient | Amount | Notes |
|---|---|---|
| Bleached cake flour | 13 ounces | Gives the cake its tender crumb; weigh for best results |
| Granulated sugar | 13 ounces | Sweetens and adds moisture to the cake |
| Baking powder | 3 teaspoons | Main leavening agent |
| Baking soda | 1/4 teaspoon | Helps with browning and structure |
| Salt | 1/2 teaspoon | Balances sweetness |
| Unsalted butter (for cake) | 8 ounces, softened | Room temperature is crucial |
| Vanilla extract | 2 teaspoons | For the cake batter |
| Almond extract | 1 teaspoon | Adds subtle depth to the cake |
| Whole milk (for cake) | 10 ounces, room temperature | Divided between two mixtures |
| Vegetable oil | 3 ounces | Keeps the cake moist |
| Large eggs | 3, room temperature | Must be at room temp or the batter will curdle |
| Cream cheese | 16 ounces, softened | Base of the chantilly cream |
| Unsalted butter (for frosting) | 8 ounces, softened | Adds richness to the frosting |
| Mascarpone cheese | 8 ounces, softened | Makes the frosting luxurious and creamy |
| Powdered sugar | 22 ounces, sifted | Sifting prevents lumps in the frosting |
| Almond extract (for frosting) | 1 teaspoon | Complements the berry flavor |
| Vanilla extract (for frosting) | 1 tablespoon | More than in the cake for depth |
| Heavy whipping cream | 16 ounces | Whipped and folded in for lightness |
| Fresh or frozen berries (for filling) | 2 cups | Blueberries, strawberries, or mixed berries |
| Granulated sugar (for filling) | 2.5 ounces | Sweetens the berry compote |
| Water | 1 ounce | For the cornstarch slurry |
| Cornstarch | 1 ounce | Thickens the berry filling |
| Lemon juice | 2 teaspoons | Brightens the berry flavor |
| Fresh berries (for decoration) | 2 cups | Use the prettiest ones you can find |
A few ingredient notes: bleached cake flour really does make a difference here. It’s softer and more finely milled than all-purpose flour, which gives you that delicate, bakery-style crumb. If you can’t find it, you can use all-purpose, but the texture won’t be quite as tender.
Mascarpone is a soft Italian cream cheese that’s richer and less tangy than American cream cheese. It’s what makes the chantilly cream so silky and luxurious. You can usually find it near the specialty cheeses or the cream cheese section at the grocery store.
And please, please make sure your butter, cream cheese, mascarpone, eggs, and milk are at room temperature before you start. Cold ingredients will cause the batter to curdle or the frosting to seize up. I usually set everything out on the counter about an hour before I start baking.
Step-by-Step Instructions for Berry Chantilly Cake
This recipe has several steps, but none of them are difficult. I like to make the cake layers one day, the frosting and filling the next, and then assemble everything on the day I’m serving it. That way, it doesn’t feel overwhelming.
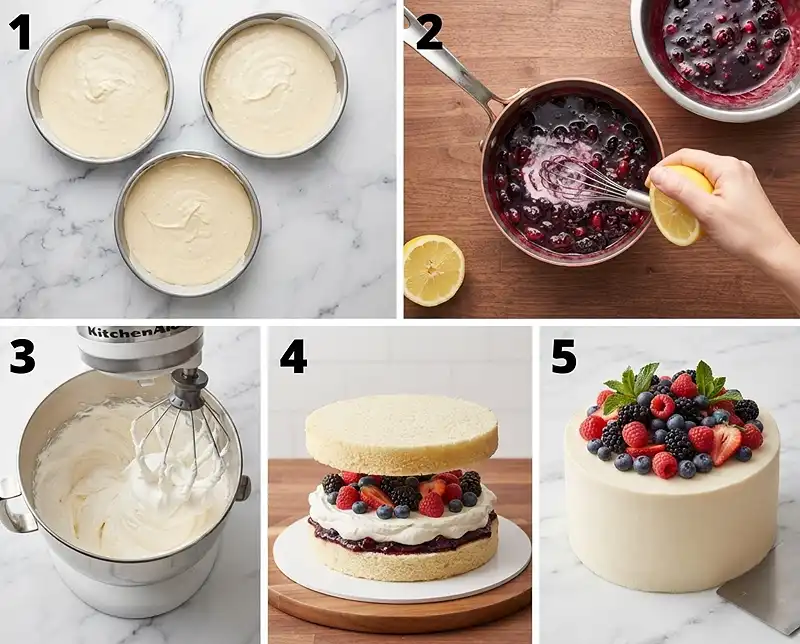
- Preheat and prep your pans: Heat your oven to 350°F (177°C). Grease three 8-inch round cake pans with butter and dust them with flour, or use cake goop (a mixture of equal parts flour, oil, and shortening). This ensures the cakes release cleanly.
- Combine the milk and oil: In a measuring cup, mix 4 ounces of the whole milk with the vegetable oil. Set this aside—you’ll add it to the dry ingredients first.
- Mix the wet ingredients: In a separate bowl, whisk together the remaining 6 ounces of milk, 2 teaspoons vanilla extract, 1 teaspoon almond extract, and the 3 room-temperature eggs until everything is well combined. This is your egg mixture.
- Combine the dry ingredients: In the bowl of a stand mixer fitted with the paddle attachment, add the cake flour, granulated sugar, baking powder, baking soda, and salt. Mix on low speed for a few seconds just to combine everything.
- Add the butter: With the mixer on the lowest speed, add the softened butter in small pieces. Mix until the mixture looks like coarse sand or wet sand. This is called the reverse creaming method, and it’s the secret to a super tender crumb.
- Add the milk and oil mixture: Pour in the milk and oil mixture all at once. Increase the mixer speed to medium (speed 4 on a KitchenAid) and mix for a full 2 minutes. Don’t skip this—it develops the cake’s structure and creates that fine, tight crumb.
- Add the egg mixture: Reduce the speed to low and add the egg and milk mixture in three separate additions, scraping down the sides of the bowl between each one. Mix just until the batter is smooth and combined. Don’t overmix at this stage.
- Divide and bake: Divide the batter evenly between the three prepared pans. I like to weigh them to make sure the layers are the same size. Bake for 25 to 35 minutes, or until a toothpick inserted in the center comes out clean and the edges are just starting to pull away from the sides of the pan.
- Release steam and cool: As soon as the cakes come out of the oven, tap each pan once firmly on the counter. This releases trapped steam and prevents the cakes from sinking or shrinking unevenly. Let them cool in the pans for 20 minutes, then turn them out onto a cooling rack.
- Freeze the layers: Once the cakes are completely cool, wrap each one tightly in plastic wrap and freeze for at least 1 hour. This makes them much easier to handle and frost later.
- Make the chantilly cream base: In the bowl of a stand mixer fitted with the paddle attachment, beat together the softened cream cheese, softened butter, and softened mascarpone until the mixture is completely smooth and there are no lumps. This can take 2 to 3 minutes.
- Add the powdered sugar: Add the sifted powdered sugar and continue mixing until the frosting is creamy and fully incorporated. Scrape down the sides as needed.
- Whip the cream: In a separate clean bowl, use the whisk attachment to whip the heavy cream to soft peaks. Add the vanilla extract and almond extract, then continue whipping until you have firm peaks. Watch closely—once it starts to thicken, it happens fast. You want stiff peaks, but not curdled or grainy cream.
- Fold in the whipped cream: Gently fold the whipped cream into the cream cheese mixture using a spatula. Fold just until everything is combined and the frosting is light and fluffy. Don’t overmix, or you’ll deflate the cream.
- Make the berry filling: In a medium saucepan, combine 2 cups of fresh or frozen berries with 2.5 ounces of sugar. Cook over medium heat, stirring occasionally, until the mixture comes to a simmer and the berries start to break down.
- Thicken the filling: In a small bowl, whisk together the cornstarch and water to make a smooth slurry. Pour this into the bubbling berry mixture, then add the lemon juice. Stir constantly and cook for 1 to 2 minutes, until the filling is thick, glossy, and holds its shape on a spoon.
- Cool the filling completely: Remove the berry filling from the heat and spread it out on a sheet pan or shallow dish to cool quickly. It needs to be completely cold before you use it, or it will melt the frosting.
- Trim the cake layers: Use a long serrated knife to trim the domed tops off each frozen cake layer so they’re flat and even. This helps the cake stack neatly.
- Start the assembly: Place the first cake layer on a cake board or your serving plate. If you’re using a turntable, now’s the time to set it up.
- Add the berry filling: Spread about one-third of the cooled berry filling evenly over the top of the first cake layer, leaving a small border around the edge.
- Add the chantilly cream: Spread a layer of chantilly cream over the berry filling. Don’t worry about it being perfect—just get a nice even layer.
- Scatter fresh berries: Scatter a handful of fresh berries over the cream layer. This adds extra pockets of fruit and looks beautiful when you slice the cake.
- Add the second layer: Place the second cake layer on top and repeat the process—berry filling, chantilly cream, and fresh berries.
- Add the top layer: Place the third cake layer on top, flat side up. Press down gently to secure everything.
- Apply a crumb coat: Spread a thin layer of chantilly cream all over the outside of the cake to seal in any crumbs. Freeze the cake for 15 minutes to let this set.
- Frost the outside: Once the crumb coat is firm, frost the outside of the cake with the remaining chantilly cream. Use a bench scraper or offset spatula to smooth the sides and create clean lines.
- Decorate with berries: Pile the remaining fresh berries on top of the cake in a generous heap. Make it look abundant and beautiful.
- Chill before serving: Refrigerate the assembled cake for at least 30 minutes before slicing. This helps everything set and makes cleaner slices. For the best flavor, let the cake sit at room temperature for 15 to 20 minutes before serving so the frosting softens slightly.
Expert Tips for the Best Berry Chantilly Cake
After making this berry chantilly cake recipe more times than I can count, I’ve picked up a few tricks that make a big difference.
First, weighing your ingredients is really important, especially for the cake flour and powdered sugar. Volume measurements can vary a lot depending on how you scoop, and that can throw off the texture of both the cake and the frosting.
When you’re making the cake batter, resist the urge to skip the 2-minute mixing step after you add the milk and oil. That’s when the gluten develops just enough to give the cake structure without making it tough. If you skip it, the cake can turn out dense or gummy.
Make sure all your dairy ingredients are truly at room temperature. Cold cream cheese will leave lumps in your frosting, and cold eggs can cause the cake batter to curdle. If you’re in a hurry, you can place the eggs in a bowl of warm water for 5 minutes, and you can microwave the cream cheese and mascarpone for about 10 seconds to take the chill off.
When you’re whipping the heavy cream, stop as soon as you see firm peaks. If you keep going, the cream will start to separate and turn grainy, and you won’t be able to fix it. It’s better to stop a little early and hand-whisk the last bit if needed.
For the berry filling, make sure it’s completely cool before you spread it on the cake. If it’s even slightly warm, it will melt the frosting and make everything slide around. I usually make the filling first and let it chill in the fridge while I work on everything else.
If you’re nervous about frosting the cake, don’t worry too much about making it perfect. The fresh berries on top will cover a multitude of sins, and rustic cakes are totally in style. Just do your best with the crumb coat, chill it, and then smooth out the final layer as much as you can.
Delicious Variations to Try
This recipe is versatile, and you can customize it based on what’s in season or what you have on hand.
Try using different berry combinations in the filling. Strawberries and blueberries are classic, but raspberries and blackberries also work beautifully. You can even use a single type of berry if that’s what you prefer.
If you want to add a little extra flavor to the cake layers, try adding a teaspoon of lemon zest to the batter. It pairs wonderfully with the berries and adds a subtle brightness.
For a boozy twist, brush each cake layer with a simple syrup made from equal parts sugar and water, with a tablespoon of amaretto or Grand Marnier added. This keeps the cake extra moist and adds a sophisticated flavor.
You can also turn this into a naked cake by skipping the outer frosting and just filling the layers. It’s a more rustic look, and you’ll have less frosting work to do.
If you’re not a fan of almond extract, you can leave it out or replace it with more vanilla. The cake will still taste amazing, just a little less complex.
For a fun summer variation, try making this with peaches instead of berries. A peach and blackberry crisp recipe inspired version would be absolutely stunning.
Troubleshooting Common Issues
Even with careful measuring and following the steps, sometimes things don’t go as planned. Here’s how to fix the most common problems.
If your cake layers come out dense or gummy, it’s usually because the ingredients weren’t at room temperature, or the batter was overmixed after adding the eggs. Make sure everything is properly warmed, and mix just until combined in that last step.
If the frosting is too soft and won’t hold its shape, it’s likely because the cream cheese or butter was too warm, or the whipped cream wasn’t stiff enough. You can try chilling the frosting for 20 to 30 minutes and then re-whipping it gently. If that doesn’t work, you can fold in a little more whipped cream that’s been whipped to stiff peaks.
If the frosting is lumpy, it means the cream cheese or mascarpone wasn’t softened enough before mixing. You can try beating it on high speed for a few minutes to smooth it out, but it’s much easier to prevent this by making sure everything is soft from the start.
If your berry filling is too runny, it might not have cooked long enough after you added the cornstarch, or the cornstarch wasn’t fully dissolved in the water. You can return it to the stove and cook it a bit longer, stirring constantly, until it thickens up.
If the cake layers are sliding around during assembly, it’s probably because the berry filling was still warm or the cake wasn’t chilled enough. Pop the whole thing in the freezer for 10 minutes between layers to help everything firm up.
If you’re having trouble getting clean slices, make sure the cake is well chilled, and use a long, sharp knife that you’ve dipped in hot water and wiped dry between each cut.
Storage and Make-Ahead Tips
One of the best things about this berry chantilly cake recipe is that it stores beautifully, and you can make parts of it ahead of time to save yourself stress on the day you’re serving it.
| Storage Method | Duration | Notes |
|---|---|---|
| Refrigerator (assembled cake) | 3-4 days | Cover loosely with plastic wrap or store in a cake carrier |
| Freezer (unfrosted cake layers) | Up to 3 months | Wrap tightly in plastic wrap, then foil |
| Freezer (assembled cake) | Up to 1 month | Freeze uncovered until firm, then wrap well |
| Refrigerator (chantilly cream) | 2-3 days | Store in an airtight container; re-whip gently before using |
| Refrigerator (berry filling) | Up to 1 week | Store in an airtight container |
The cake layers freeze incredibly well. I usually bake them, let them cool completely, wrap each one tightly in plastic wrap, then wrap them again in aluminum foil. You can freeze them for up to 3 months. When you’re ready to assemble the cake, let them thaw in the fridge overnight, or just work with them while they’re still frozen—they’re actually easier to frost that way.
The chantilly cream can be made a day or two ahead and stored in the fridge in an airtight container. It might firm up a bit in the cold, so let it sit at room temperature for about 20 minutes and give it a gentle stir before you use it. Don’t re-whip it with a mixer, or you might overbeat it.
The berry filling can be made up to a week in advance and stored in an airtight container in the fridge. Just make sure it’s completely cool before you use it.
Once the cake is assembled, store it in the refrigerator. It will keep for 3 to 4 days, though it’s definitely best within the first couple of days. The fresh berries on top will start to soften and release juice after a while, so if you’re making it more than a day ahead, you might want to add the berries just before serving.
You can also freeze the fully assembled cake. Freeze it uncovered on a sheet pan until the frosting is firm, then wrap it well in plastic wrap and foil. Thaw it in the fridge overnight before serving. The texture of the fresh berries might suffer a bit, but the cake itself will be just fine.
Always serve this cake cold or slightly cool. The chantilly cream is delicate and can start to soften too much at room temperature, especially on a warm day. I like to take it out of the fridge about 15 to 20 minutes before serving so it’s not ice-cold, but still firm enough to hold its shape.
Berry Chantilly Cake Recipe FAQs
What is berry chantilly cake?
Berry chantilly cake is a light and elegant layer cake made with vanilla cake layers, mascarpone whipped cream frosting (chantilly cream), and fresh mixed berries. The cake is known for its delicate flavor and beautiful presentation, often featuring strawberries, blueberries, raspberries, and blackberries between the layers and on top.
How do I prevent the chantilly cream from becoming runny?
To keep your chantilly cream stable, make sure all ingredients and mixing bowl are well chilled before starting. Use cold heavy whipping cream with at least 36% fat content, and add mascarpone cheese which helps stabilize the frosting. Avoid over-whipping, and keep the finished cake refrigerated until serving. You can also add a tablespoon of cornstarch or powdered sugar stabilizer to help maintain the texture.
Can I make berry chantilly cake ahead of time?
Yes, you can make components ahead. Bake the cake layers up to 2 days in advance, wrap them tightly in plastic wrap, and refrigerate. You can also freeze layers for up to 3 months. The assembled cake is best made 4 to 24 hours before serving, which allows the flavors to meld. Store the finished cake covered in the refrigerator. Avoid assembling more than 2 days ahead as the berries may release juice and make the cake soggy.
What berries work best for berry chantilly cake?
The best berries are fresh strawberries, blueberries, raspberries, and blackberries. Strawberries should be sliced, while smaller berries can be left whole or halved. Choose ripe but firm berries that aren’t overly juicy. Avoid frozen berries as they release too much moisture when thawed and can make the cake soggy. Wash and thoroughly dry all berries before using them to prevent excess moisture.
How should I store leftover berry chantilly cake?
Store leftover berry chantilly cake covered in the refrigerator for up to 3 days. Use a cake dome or cover it loosely with plastic wrap to prevent the cream from absorbing other flavors. The cake must be kept refrigerated due to the fresh whipped cream and berries. Let it sit at room temperature for about 10 to 15 minutes before serving for the best texture and flavor. Do not freeze assembled cake as the cream and berries will not maintain their quality.
Final Thoughts
This berry chantilly cake recipe is one of those desserts that feels special every single time you make it. It’s beautiful, it’s delicious, and it’s surprisingly doable, even if you’re not an expert baker. The combination of soft vanilla cake, light and creamy frosting, and fresh berries is just unbeatable.
Whether you’re celebrating a birthday, hosting a dinner party, or just want to treat yourself to something amazing, this cake delivers. And if you’re looking for more fruity desserts to try, check out this lemon curd blueberry loaf recipe or this 2-ingredient protein cheesecake recipe for lighter options. And if you’re into using fresh ingredients in unexpected ways, you’ll love these spinach cottage cheese oat pancakes.
Give this berry chantilly cake recipe a try, and I promise you won’t regret it. Let me know how it turns out for you, and happy baking!