2 Ingredient Protein Cheesecake Recipe
This incredibly simple 2 ingredient protein cheesecake recipe transforms cottage cheese and protein powder into a creamy, satisfying dessert that tastes indulgent but keeps your macros in check.
I stumbled onto this recipe during one of those late-night protein dessert experiments, and honestly, I couldn’t believe how good it turned out. Just two ingredients sitting in my fridge became the easiest high protein treat I’ve made in ages.
Table of Contents
What Is a 2 Ingredient Protein Cheesecake?
This is exactly what it sounds like: a baked cheesecake made with cottage cheese and vanilla protein powder. That’s it. No cream cheese, no eggs, no complicated steps. You blend, bake, and end up with a firm, sliceable dessert that has the tang of cheesecake and a serious protein punch.
The cottage cheese provides the creamy base and most of the protein, while the protein powder adds sweetness, flavor, and helps the texture set up beautifully in the oven. It’s kind of magical how these two simple ingredients come together.
Why You’ll Love This High Protein Cheesecake
This easy protein dessert checks all the boxes when you want something sweet without derailing your goals. Here’s why it works:
It’s ridiculously simple. If you can use a blender, you can make this. There’s no crust to press, no water bath to fuss with, and no long list of ingredients to track down.
The protein content is impressive. Depending on your protein powder, you’re looking at around 30-35 grams of protein per serving. That’s dessert that actually helps you hit your daily targets.
It satisfies cheesecake cravings without the guilt. You get that rich, tangy, creamy texture you want from cheesecake, but with a fraction of the calories and carbs.
The texture is surprisingly authentic. I was skeptical the first time, but after chilling, this healthy cheesecake has a dense, creamy bite that really does remind you of traditional cheesecake.
It’s endlessly customizable. Once you nail the basic recipe, you can add cocoa powder, swap vanilla for chocolate protein, layer in fruit, or experiment with different toppings.

2 Ingredient Protein Cheesecake
Ingredients
Ingredients
- 1 cup cottage cheese
- 1 scoop vanilla protein powder
Instructions
- Preheat your oven to 350°F (175°C).
- In a blender or food processor, combine the cottage cheese and protein powder. Blend until completely smooth and creamy. There should be no lumps of cottage cheese remaining.
- Pour the mixture into a small, oven-safe dish or ramekin.
- Bake for 20-25 minutes, or until the cheesecake is set and lightly golden around the edges.
- Let cool completely before refrigerating for at least 1 hour to chill and firm up.
- Serve plain or with your favorite toppings like fresh berries, a drizzle of honey, or sugar-free syrup.
Ingredients
This cottage cheese cheesecake only needs two ingredients, but choosing the right versions makes a difference in taste and texture.

| Ingredient | Amount | Notes |
|---|---|---|
| Cottage cheese | 1 cup | Full-fat or low-fat both work; full-fat gives creamier texture |
| Vanilla protein powder | 1 scoop | Whey or plant-based; look for one that tastes good on its own |
Choosing Your Cottage Cheese
I’ve tested this with several brands and fat levels. Full-fat cottage cheese (4% milkfat) creates the richest, creamiest result. It blends smoother and tastes more indulgent. Low-fat or fat-free versions work too, but the texture will be slightly less creamy and you might notice a bit more tang.
Small curd or large curd doesn’t matter much since you’re blending it smooth anyway. I usually grab whatever’s on sale. If your cottage cheese seems particularly watery, you could drain off some of the liquid before measuring, but I’ve never found this necessary.
Picking the Right Protein Powder
Your protein powder choice matters here because it’s providing all the sweetness. I prefer vanilla whey protein isolate because it blends smoothly and tastes clean. Casein works beautifully too and actually creates an even denser texture.
Plant-based proteins work, but be choosy. Some have grainy textures or strong aftertastes that come through in the final cheesecake. I’ve had good luck with pea-rice protein blends that are well-flavored.
Whatever you choose, make sure it’s a protein powder you actually like the taste of on its own. That flavor is going to be front and center in your finished dessert.
Instructions
Making this 2 ingredient protein cheesecake recipe is straightforward, but a few small details will give you the best texture and prevent common issues.

- Preheat your oven to 350°F (175°C). Get this going first so your oven is fully heated and ready. An oven thermometer is helpful if your oven runs hot or cool, as overbaking will make the texture rubbery.
- Combine cottage cheese and protein powder in a blender or food processor. Add the full cup of cottage cheese first, then your scoop of protein powder on top. This order helps everything blend more easily.
- Blend until completely smooth and creamy. This is the most important step. Blend for at least 30-45 seconds, stopping to scrape down the sides if needed. You want zero lumps of cottage cheese remaining. The mixture should look like thick, smooth cake batter. If you’re using a less powerful blender, this might take a full minute or two.
- Pour the mixture into a small oven-safe dish or ramekin. I use a small 4-inch ramekin or a mini loaf pan. You can also divide the mixture between two smaller ramekins if you want individual servings. Lightly grease your dish with cooking spray or a tiny bit of butter to make removal easier, though it’s not strictly necessary.
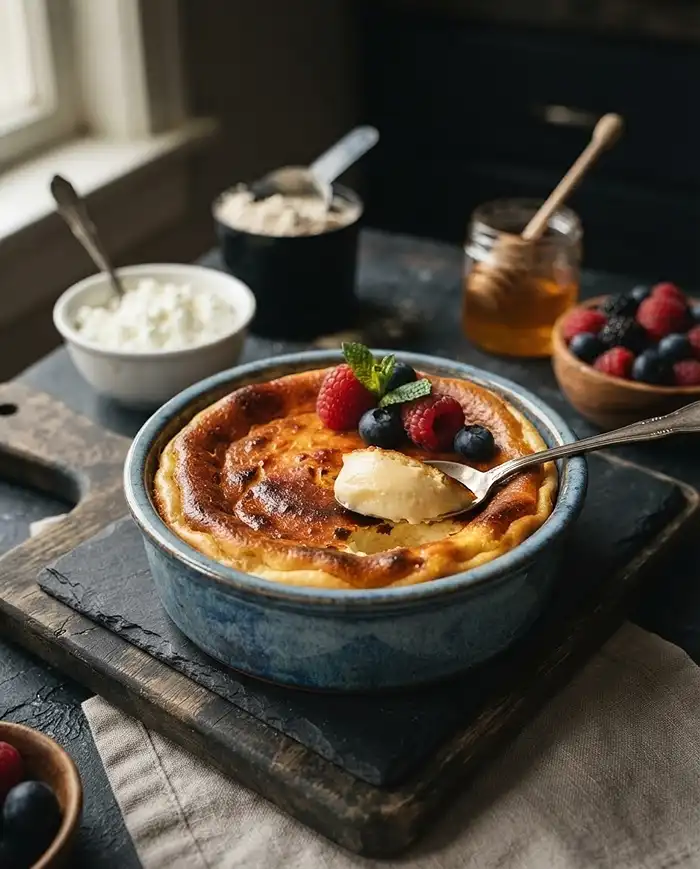
- Bake for 20-25 minutes. You’re looking for the cheesecake to be set in the center with lightly golden edges. It should still jiggle very slightly in the middle when you gently shake the dish, similar to how a traditional cheesecake behaves. The top might puff up slightly during baking and that’s completely normal; it will settle as it cools.
- Let cool completely at room temperature. This takes about 30-45 minutes. The cheesecake will firm up significantly as it cools. Don’t skip this step or it might crack when you move it.
- Refrigerate for at least 1 hour before serving. The chilling time is when the magic happens. The texture becomes dense and sliceable, and the flavors meld together. Honestly, it’s even better after 3-4 hours or overnight if you can wait that long.
- Serve with your favorite toppings. Fresh berries are my go-to, especially strawberries or blueberries. A drizzle of honey adds nice sweetness, or try sugar-free syrup if you’re watching carbs. A dollop of Greek yogurt, a sprinkle of cinnamon, or a few dark chocolate chips all work beautifully too.
Expert Tips for Perfect Results
After making this dozens of times and troubleshooting with readers, here are the tricks that make the biggest difference:
Blend longer than you think you need to. Seriously, this is where most people go wrong. You need that cottage cheese completely smooth. If you see even tiny curds, keep blending. The texture of your final cheesecake depends on this step.
Don’t overbake. The cheesecake continues cooking and firming up as it cools. If you bake it until it’s completely firm in the oven, it’ll be too dense and rubbery once chilled. Pull it when there’s still a slight wobble in the center.
Be patient with chilling. I know it’s tempting to dig in right away, but warm protein cheesecake has a weird texture. It needs that fridge time to develop the proper cheesecake consistency.
Use room temperature cottage cheese. If your cottage cheese comes straight from a cold fridge, let it sit out for 10-15 minutes before blending. It mixes more smoothly and you’ll get a better texture.
Adjust sweetness to your taste. If your protein powder isn’t very sweet, you can blend in a tablespoon of honey, maple syrup, or your preferred sweetener. Just remember this adds extra carbs and calories.
Watch for protein powder clumping. Some protein powders clump when they hit moisture. If this happens, add the protein powder gradually while blending, or shake it through a sieve first.
Delicious Variations to Try
Once you’ve mastered the basic high protein cheesecake, these variations keep things interesting:
Chocolate protein cheesecake: Use chocolate protein powder instead of vanilla, or add 1-2 tablespoons of unsweetened cocoa powder to the vanilla base. Top with whipped cream and chocolate shavings.
Berry swirl version: Before baking, swirl in 2 tablespoons of mashed berries or sugar-free jam. Don’t overmix; you want ribbons of fruit throughout.
Lemon cheesecake: Add the zest of one lemon and a squeeze of lemon juice to the blender. This brightens the flavor and cuts through the richness beautifully.
Pumpkin spice: Mix in 2-3 tablespoons of pumpkin puree and a half teaspoon of pumpkin pie spice. Perfect for fall and adds extra creaminess.
Coffee flavored: Dissolve a teaspoon of instant espresso powder in a tiny splash of hot water, then blend it into your mixture. Coffee and cheesecake are a match made in heaven.
Mini cheesecake bites: Divide the mixture among a muffin tin lined with paper cups. Bake for just 12-15 minutes. These are perfect for meal prep and portion control.
If you enjoy experimenting with protein desserts, you might also love this cottage cheese lava cake or these baked protein pancake bowls for breakfast.
Troubleshooting Common Issues
My cheesecake turned out grainy: You didn’t blend the cottage cheese long enough. Every single curd needs to be broken down completely. Next time, blend for at least a full minute, scraping down the sides halfway through.
The texture is rubbery or tough: You overbaked it. Protein sets up quickly with heat, so even an extra 5 minutes can make it too firm. Check it at 20 minutes and remember it should still have a slight jiggle.
It’s too tangy: Cottage cheese has a natural tang that some protein powders don’t mask well. Try a sweeter protein powder, add a tablespoon of honey before baking, or serve it with sweet toppings like maple syrup or fruit.
The top cracked while cooling: This happens when there’s a dramatic temperature change. Let it cool gradually at room temperature before moving it to the fridge. Cracks are just cosmetic though; the taste isn’t affected.
It didn’t set properly and stayed soft: Your protein powder might not have enough binding power, or you under-baked it. Some plant-based proteins don’t set as firmly as whey. Try baking 3-5 minutes longer next time, or add a tablespoon of cornstarch to help it set.
There’s liquid pooling on top: Some cottage cheese brands are wetter than others. You can drain off any liquid from the cottage cheese before measuring, or just pour off any liquid that appears after baking and chilling.
Storage
This easy protein dessert stores beautifully, making it perfect for meal prep or having a healthy treat ready when cravings hit.
| Storage Method | Duration | Best Practices |
|---|---|---|
| Refrigerator | 4-5 days | Cover tightly with plastic wrap or store in airtight container |
| Freezer | 2-3 months | Wrap well in plastic wrap then foil; thaw in fridge overnight |
Store your cottage cheese cheesecake covered in the fridge. I like to press plastic wrap directly onto the surface to prevent it from drying out or absorbing other fridge odors. An airtight container works great too.
The texture actually improves after a day in the fridge, so don’t hesitate to make this ahead. The flavors develop and meld together, and it becomes even more dense and sliceable.
For freezing, slice it first if you want to grab individual portions. Wrap each piece separately in plastic wrap, then place them all in a freezer bag. Frozen cheesecake thaws in about 2-3 hours in the fridge or 30 minutes at room temperature. The texture holds up remarkably well after freezing.
According to the FDA’s guidelines on food storage, dairy-based desserts like this should be kept at 40°F or below and consumed within the recommended timeframe for best quality and safety.
Serving Suggestions
This healthy cheesecake is delicious plain, but toppings take it to the next level. Fresh strawberries or mixed berries add a fruity contrast that balances the richness perfectly. I often make a quick berry compote by warming frozen berries with a splash of water until they break down.
For extra protein, top with a dollop of Greek yogurt or a spoonful of nut butter. Almond butter and cheesecake is a combination I never knew I needed.
If you’re not worried about keeping it sugar-free, a drizzle of honey or real maple syrup adds a lovely sweetness. For a low-carb option, sugar-free caramel or chocolate syrup works beautifully.
Crunch factor helps too. Crushed graham crackers, granola, or chopped nuts give you textural contrast. A sprinkle of cinnamon or cocoa powder adds visual appeal and extra flavor.
This pairs wonderfully with coffee or tea for an afternoon snack, or serve it as a post-dinner dessert that won’t leave you feeling heavy. It’s substantial enough to be satisfying but light enough that you don’t need a nap afterward.
For another creative cottage cheese dessert, check out this Japanese yogurt cheesecake that’s equally simple and delicious.
2 Ingredient Protein Cheesecake Recipe FAQs
What are the 2 ingredients needed for protein cheesecake?
The two main ingredients for a basic protein cheesecake are Greek yogurt (or cream cheese) and protein powder. Typically, you’ll use about 2 cups of Greek yogurt and 1-2 scoops of your favorite protein powder. Some variations may include sweetener as an optional third ingredient for added taste.
How long does it take to make a 2 ingredient protein cheesecake?
A 2 ingredient protein cheesecake is very quick to prepare. The mixing process takes only about 5 minutes. However, you’ll need to refrigerate it for at least 2-4 hours, or preferably overnight, to allow it to set properly and achieve the best texture. Total hands-on time is minimal, making it a convenient dessert option.
Do I need to bake a 2 ingredient protein cheesecake?
No, a 2 ingredient protein cheesecake is a no-bake recipe. You simply mix the Greek yogurt and protein powder together until smooth, pour the mixture into a pan or dish, and refrigerate until firm. This makes it an easy dessert that requires no oven time and is perfect for hot weather or when you want a quick treat.
How many calories are in a 2 ingredient protein cheesecake?
The calorie content varies depending on the specific ingredients used, but generally, a 2 ingredient protein cheesecake made with non-fat Greek yogurt and whey protein powder contains approximately 120-150 calories per serving. The entire cheesecake typically has around 400-600 calories total, making it a relatively low-calorie, high-protein dessert option compared to traditional cheesecake.
Can I add toppings or flavors to my 2 ingredient protein cheesecake?
Absolutely! While the base recipe only requires 2 ingredients, you can customize your protein cheesecake with various toppings and mix-ins. Popular additions include fresh berries, sugar-free chocolate chips, cocoa powder mixed into the batter, vanilla extract, cinnamon, or a drizzle of nut butter on top. You can also experiment with different protein powder flavors like chocolate, vanilla, or strawberry to change the taste.
Final Thoughts
This 2 ingredient protein cheesecake recipe has become my go-to when I want something sweet but don’t want to derail my day. The fact that it comes together in minutes with ingredients I always have on hand makes it even better.
What I love most is how adaptable it is. Once you make the basic version, you’ll start thinking of all kinds of ways to customize it. Different protein powder flavors, mix-ins, toppings… the possibilities keep it from ever getting boring.
Don’t let the simplicity fool you. This high protein cheesecake really does satisfy those cheesecake cravings, and the texture is surprisingly spot-on for something so easy. It’s become my favorite recommendation for anyone just starting to experiment with protein desserts.
Give this recipe a try this week and let me know what you think! I’d love to hear what toppings or variations you come up with. Happy baking!