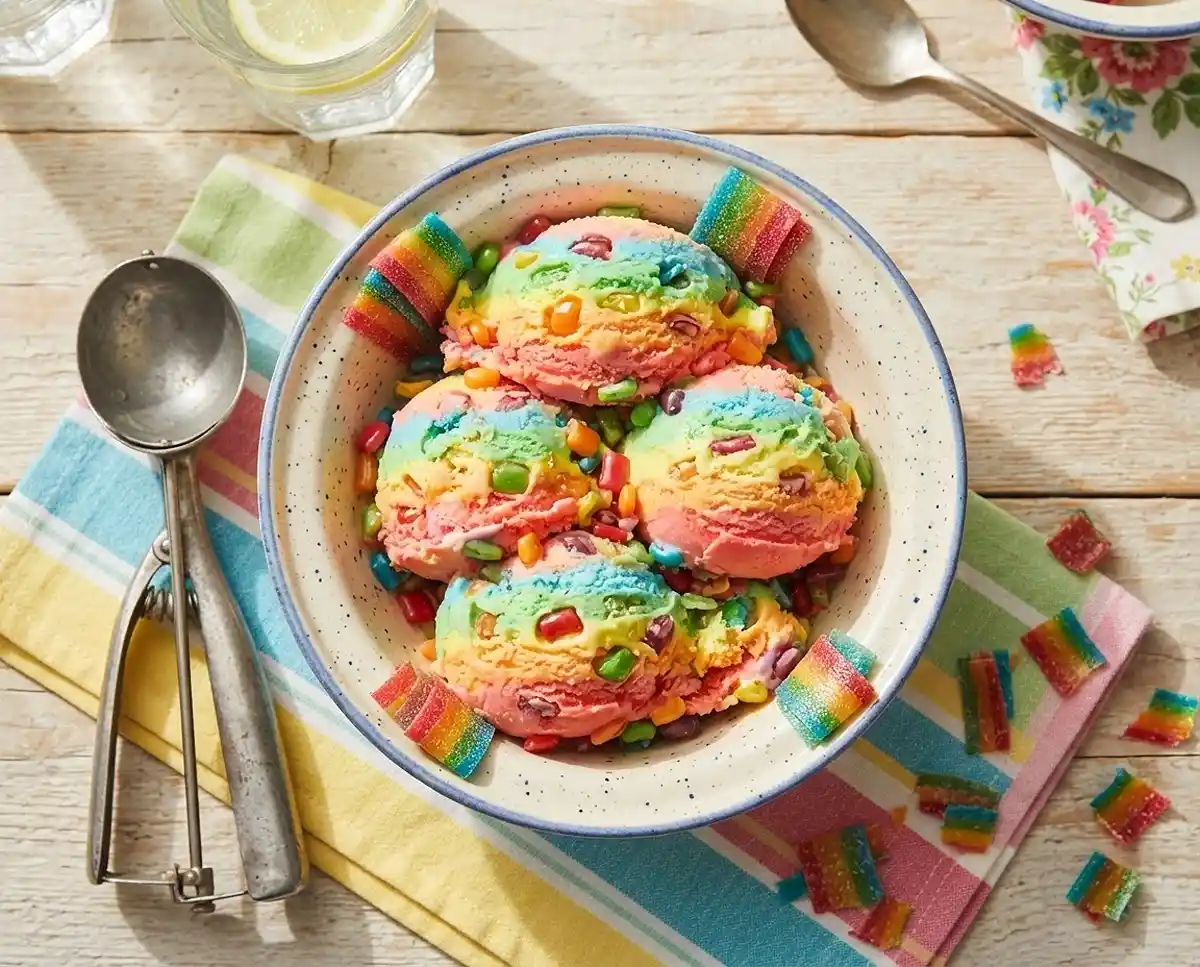
Fruit Roll-Up Ice Cream Recipe
This easy no-churn fruit roll-up ice cream recipe combines childhood nostalgia with creamy frozen dessert magic. Ready in just 10 minutes of prep time with only 3 simple ingredients.
I’ll be honest—when I first heard about fruit roll-up ice cream, I thought someone was pulling my leg. But after watching my niece dip her Fruit Roll-Up into ice cream at a birthday party, I realized there was something genius happening here. The chewy, fruity candy mixed with cold, creamy ice cream? It’s like childhood and dessert had the best collision ever.
This homemade fruit roll-up ice cream takes that combination and makes it even better by swirling those iconic candy strips right into a luscious no-churn base. No ice cream maker needed, no complicated steps, just pure fun in frozen form.
Table of Contents
Why You’ll Love This Fruit Roll-Up Ice Cream
This easy fruit roll-up dessert hits all the right notes, especially if you grew up peeling these fruity sheets off plastic and rolling them onto your tongue. It’s playful, it’s delicious, and honestly? It’s ridiculously simple.
You’ll love it because it needs just three ingredients and about 10 minutes of active work. No fancy equipment, no custard base to worry about, and no standing over a hot stove. You whip, you fold, you freeze. That’s it.
The texture is what really gets me. The ice cream itself is smooth and velvety thanks to the sweetened condensed milk, but then you hit these chewy ribbons of Fruit Roll-Up that stayed soft even when frozen. They add little bursts of intense fruit flavor and a fun textural surprise in every bite.
Plus, you can customize this with whatever Fruit Roll-Up flavor you loved as a kid. I’m partial to the strawberry ones, but my husband swears by the tropical punch. Mix and match, go wild—there are no rules here.
Fruit Roll-Up Ice Cream
Ingredients
Ingredients
- 1 cup heavy cream
- ½ cup sweetened condensed milk
- 6-8 Fruit Roll-Ups cut into small pieces
Instructions
- In a large bowl, whip the heavy cream until stiff peaks form.
- Gently fold in the sweetened condensed milk until just combined.
- Fold in the chopped Fruit Roll-Up pieces.
- Transfer the mixture to a freezer-safe container and freeze for at least 4-6 hours, or until solid.
- Scoop and serve!
Ingredients You’ll Need
This no-churn fruit roll-up ice cream recipe is ridiculously minimal. You probably already have the cream and condensed milk in your pantry, and the Fruit Roll-Ups are just a quick grocery run away.
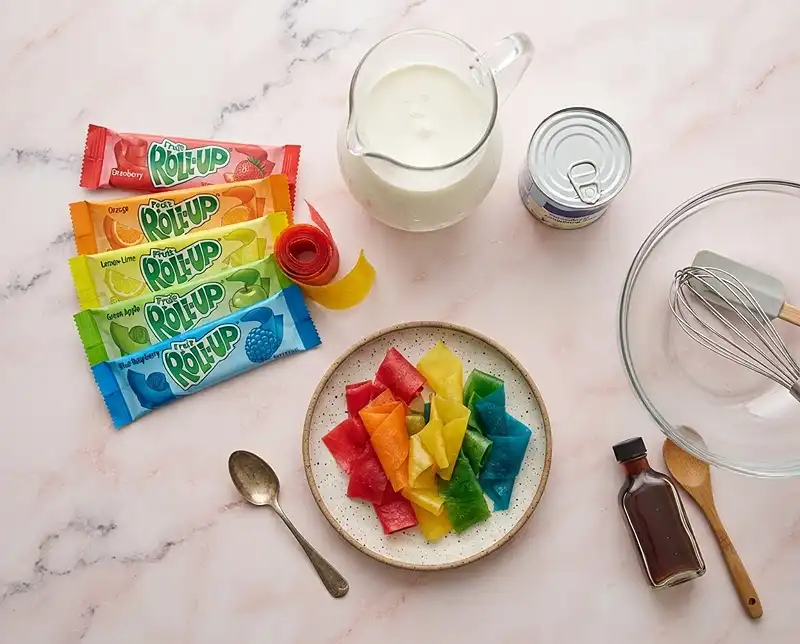
| Ingredient | Amount | Notes |
|---|---|---|
| Heavy cream | 1 cup | Cold from the fridge works best for whipping |
| Sweetened condensed milk | 1/2 cup | Adds sweetness and keeps the texture creamy |
| Fruit Roll-Ups | 6-8 rolls | Any flavor you love—cut into small pieces |
The heavy cream is your foundation here. When whipped, it creates all those tiny air bubbles that give this ice cream its light, scoopable texture. Make sure it’s cold—I usually pop my mixing bowl in the fridge for 15 minutes before I start, especially in summer.
Sweetened condensed milk is the magic ingredient in no-churn ice cream. It’s thick, sweet, and has a lower freezing point than regular milk, which means your ice cream stays creamy instead of turning into a rock-hard block. According to the USDA, the sugar content in sweetened condensed milk helps prevent large ice crystals from forming during freezing.
As for the Fruit Roll-Ups, I cut mine into roughly half-inch pieces. Too big and they’re hard to distribute evenly; too small and they kind of dissolve into the base. You want visible swirls and chunks.
Step-by-Step Instructions
Making homemade fruit roll-up ice cream is honestly one of the easiest frozen desserts you’ll ever tackle. The whole process takes about 10 minutes, then it’s just a waiting game while it freezes.
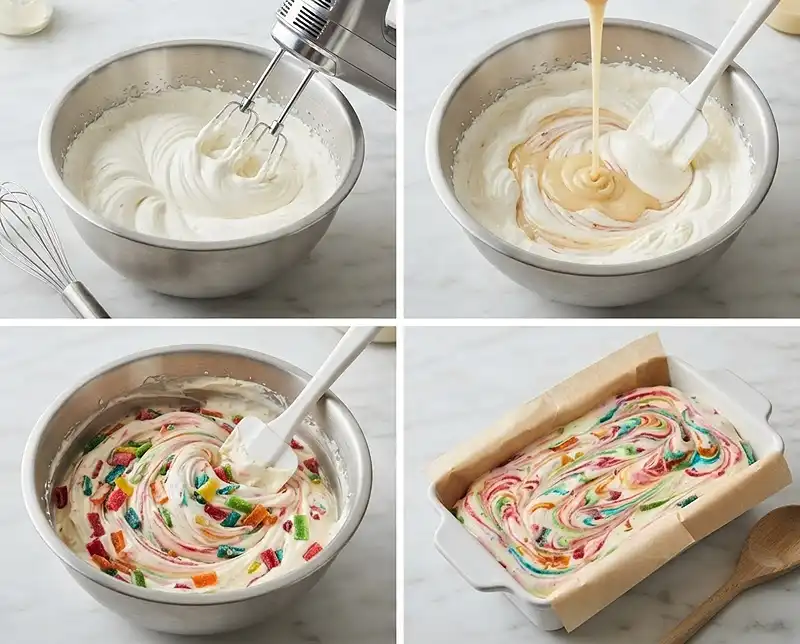
- Whip the cream until stiff peaks form. Pour your cold heavy cream into a large mixing bowl—I use my stand mixer with the whisk attachment, but a hand mixer works great too. Start on medium speed and gradually increase to medium-high. Whip for about 3-4 minutes until the cream holds firm peaks when you lift the whisk. You’ll know it’s ready when the peaks stand straight up without drooping. Don’t over-whip or you’ll end up with butter, but don’t under-whip either or your ice cream will be icy.
- Gently fold in the sweetened condensed milk. Pour the condensed milk over your whipped cream and use a rubber spatula to fold it in with a gentle touch. I use a motion like I’m scooping from the bottom and folding over the top, rotating the bowl as I go. You want to combine them until you don’t see any more white streaks, but be careful not to deflate all that air you just whipped in. This usually takes about 20-30 folds.
- Fold in the Fruit Roll-Up pieces. Add your cut-up Fruit Roll-Ups and fold them through the mixture with that same gentle motion. They’ll want to stick together a bit, so break up any clumps with your fingers as you go. I like to reserve a small handful to press into the top for a fun look, but that’s totally optional. The pieces will create colorful swirls throughout your ice cream.
- Transfer to a freezer-safe container. Pour the mixture into a loaf pan, a shallow freezer-safe container, or whatever vessel you have that holds about 3-4 cups. I like using a loaf pan because it’s the perfect shape for scooping later. Smooth the top with your spatula and press any reserved Fruit Roll-Up pieces on top if you’re feeling fancy.
- Freeze until solid. Cover your container with plastic wrap pressed directly onto the surface of the ice cream, then add a lid or aluminum foil over that. This double coverage prevents freezer burn and ice crystals. Freeze for at least 4-6 hours, though I usually leave mine overnight. When it’s ready, it should be firm enough to scoop but still creamy, not rock-hard.
- Scoop and serve. Let the ice cream sit at room temperature for about 5 minutes before scooping if it’s super firm. Use a sturdy ice cream scoop dipped in warm water between scoops for the prettiest servings. The Fruit Roll-Up ribbons will be visible throughout, and they stay wonderfully chewy even when frozen.

Expert Tips for Perfect Results
After making this fruit roll-up ice cream recipe a dozen times (yes, really—it became a summer obsession), I’ve picked up a few tricks that make the difference between good and absolutely incredible.
Chill your mixing bowl and whisk attachment in the freezer for 15 minutes before whipping the cream. Cold equipment helps the cream whip faster and hold its structure better. On hot days, I’ve even set my mixing bowl over a larger bowl filled with ice while whipping.
Don’t skip the folding technique. I know it’s tempting to just stir everything together with a spoon, but folding really does matter. It keeps all those air bubbles intact, which is what makes no-churn ice cream creamy instead of dense and heavy.
Cut your Fruit Roll-Ups with kitchen scissors instead of a knife. They tend to stick to knives, but scissors make quick work of them. I usually cut them while they’re still on the plastic backing, which makes it even easier.
Use a shallow, wide container if you want quicker freezing. A loaf pan works perfectly and usually freezes solid in about 4 hours. Deeper containers might need the full 6 hours or even overnight.
If you’re making this for a party, scoop it into individual serving cups a few hours ahead and keep them in the freezer. It’s way easier than trying to scoop rock-hard ice cream when you have hungry guests waiting.
Fun Variations to Try
The beauty of this easy fruit roll-up dessert is how adaptable it is. Once you’ve made the basic version, these variations will keep things interesting.
Try a rainbow swirl by using three different colored Fruit Roll-Ups—strawberry, tropical punch, and berry—and keeping them somewhat separate as you fold. You’ll get gorgeous color ribbons throughout.
Make it extra nostalgic by adding mini marshmallows or crushed graham crackers along with the Fruit Roll-Ups. It gives you different textures and reminds me of those lunch box treats we all loved.
Create a grown-up version by adding a tablespoon of your favorite liqueur to the condensed milk before folding. Strawberry liqueur with strawberry Fruit Roll-Ups? Chef’s kiss. Just remember that alcohol lowers the freezing point, so it might need an extra hour in the freezer.
Turn it into ice cream sandwiches by scooping portions between cookies once it’s frozen. Graham crackers work great, but so do chocolate chip cookies or even more Fruit Roll-Ups if you’re feeling really wild.
Mix in some fresh fruit along with the Fruit Roll-Ups. Diced strawberries or raspberries add a fresher flavor that balances the candy sweetness nicely.
For more fun frozen treats, check out my homemade fudgesicles recipe that’s equally simple and nostalgic.
Troubleshooting Common Issues
Even though this recipe is super straightforward, I’ve heard from readers who ran into a few hiccups. Here’s how to fix the most common problems.
If your ice cream turns out icy instead of creamy, you likely under-whipped the cream or deflated it too much when folding. Make sure those peaks are truly stiff before you add the condensed milk, and fold gently rather than stirring.
Ice cream too hard to scoop? This can happen if your freezer runs really cold. Let it sit on the counter for 5-10 minutes before serving, or store it in a slightly warmer part of your freezer (not right against the back wall where it’s coldest).
If the Fruit Roll-Ups all clumped together instead of distributing evenly, they were probably cut too large or you didn’t fold them in thoroughly enough. Smaller pieces and a few extra gentle folds should solve this next time.
Mixture won’t hold peaks? Your cream might have been too warm or you over-whipped it past stiff peaks into butter territory. Start with cold cream and stop as soon as the peaks hold their shape firmly.
Noticed freezer burn or ice crystals on top? Make sure you’re covering the surface with plastic wrap before adding a lid. That direct contact prevents air exposure that causes crystallization. The FDA notes that proper packaging is key for maintaining frozen dessert quality.
Storage and Shelf Life
This no-churn fruit roll-up ice cream stores beautifully in the freezer, making it perfect for keeping on hand when you need a quick dessert or sweet treat.
| Storage Method | Duration | Best Practices |
|---|---|---|
| Freezer (covered) | Up to 2 weeks | Press plastic wrap directly on surface, then seal with lid |
| Individual portions | Up to 2 weeks | Scoop into cups, cover tightly, stack to save space |
| Counter thawing | 5-10 minutes | Let sit before scooping if very firm |
I always store mine in an airtight container with plastic wrap pressed right against the ice cream’s surface. This double protection prevents those annoying ice crystals from forming and keeps the texture perfectly creamy.
Technically, homemade ice cream can last up to a month in the freezer, but I find the texture and flavor are best within the first two weeks. After that, the Fruit Roll-Up pieces can start to get a little too firm and the overall texture becomes slightly grainy.
If you’re meal prepping or making this ahead for a party, scoop it into individual portions and store them in a covered container. They’re grab-and-go ready, and portion control is built right in.
Never refreeze melted ice cream—the texture will never be the same. Scoop what you need and get the container back in the freezer quickly to maintain quality.
Looking for more make-ahead treats? My homemade peanut butter cups are another freezer-friendly favorite that’s perfect alongside this ice cream.
Fruit Roll-Up Ice Cream FAQs
What is Fruit Roll-Up Ice Cream?
Fruit Roll-Up Ice Cream is a creative dessert that combines traditional ice cream with pieces of Fruit Roll-Ups candy. The chewy, fruity strips are either mixed into the ice cream, wrapped around scoops, or used as a colorful topping to add a nostalgic twist and extra fruit flavor to the frozen treat.
How do you make Fruit Roll-Up Ice Cream at home?
To make Fruit Roll-Up Ice Cream at home, start with your favorite vanilla or fruit-flavored ice cream. Cut Fruit Roll-Ups into small pieces and fold them into softened ice cream, then refreeze. Alternatively, you can wrap whole Fruit Roll-Ups around ice cream scoops just before serving, or blend them into homemade ice cream during the churning process for a marbled effect.
What flavors of Fruit Roll-Ups work best with ice cream?
Strawberry, tropical punch, and berry flavored Fruit Roll-Ups are popular choices that pair well with vanilla, strawberry, or mixed berry ice cream. For more adventurous combinations, try grape or cherry Fruit Roll-Ups with chocolate ice cream. The key is matching complementary flavors or creating fun contrasts that appeal to your taste preferences.
Do Fruit Roll-Ups stay chewy when mixed with ice cream?
When Fruit Roll-Ups are mixed directly into ice cream and frozen, they become harder and less chewy due to the cold temperature. However, they begin to soften and regain some chewiness as the ice cream melts slightly at room temperature. For maximum chewiness, add Fruit Roll-Ups as a fresh topping right before serving rather than freezing them with the ice cream.
Is Fruit Roll-Up Ice Cream available at stores or ice cream shops?
Fruit Roll-Up Ice Cream is primarily a homemade or social media trend rather than a widely available commercial product. Some independent ice cream shops or dessert cafes may offer it as a special or limited-time item, and certain establishments create custom ice cream rolls with Fruit Roll-Ups. Your best option is typically to make it yourself at home or request it at local shops that offer customizable ice cream creations.
Serving Suggestions
This fruit roll-up ice cream recipe is delicious on its own, but there are so many fun ways to serve it that amp up the presentation and flavor even more.
Serve it in waffle cones and let kids press extra Fruit Roll-Up pieces onto the outside of the ice cream for a totally over-the-top treat. It’s messy, it’s fun, and it’s exactly what summer desserts should be.
Make it part of an ice cream sundae bar with toppings like whipped cream, sprinkles, crushed cookies, and more Fruit Roll-Ups. Let everyone build their own creation.
Pair it with something refreshing on a hot day—my strawberry acai energy refresher makes a great beverage alongside this sweet treat.
Turn it into an ice cream cake by spreading it into a larger pan, freezing until solid, and decorating the top with whipped cream and colorful Fruit Roll-Up ribbons. It’s surprisingly impressive for how easy it is.
Serve small scoops as a palate cleanser between courses at a fun dinner party. The fruity flavor and playful presentation always get a laugh and feel like a perfect nostalgic note.
Ready to Make This Fun Frozen Treat?
This fruit roll-up ice cream is proof that the best desserts don’t have to be complicated. With just three ingredients and a few minutes of easy work, you can create something that tastes like childhood, looks impressive, and makes everyone smile.
Whether you’re making it for your kids, bringing it to a summer potluck, or just indulging your own nostalgic cravings, this easy fruit roll-up dessert delivers pure fun in every scoop. The creamy texture, the chewy candy ribbons, the customizable flavors—it’s everything you want in a frozen treat without any of the fuss.
Give this homemade fruit roll-up ice cream a try this weekend. I promise you’ll be surprised at how something so simple can taste so good. And when you do make it, I’d love to hear which Fruit Roll-Up flavor you chose—drop a comment or tag me with your colorful creations!
For more easy recipes that bring back childhood memories, browse through my all recipes collection. Happy scooping!