Cottage Cheese Chicken Wrap Recipe
This cottage cheese chicken wrap recipe transforms simple cottage cheese into a crispy, protein-packed flatbread that holds perfectly for your favorite Caesar chicken filling.
I stumbled onto cottage cheese wraps during one of those “what can I make without going to the store” moments, and honestly, I was skeptical. But after watching that cottage cheese transform into a golden, sturdy flatbread in my oven, I was completely sold. Now it’s my go-to when I want something filling that doesn’t leave me sluggish an hour later.
This isn’t one of those recipes where you need fancy equipment or ingredients you’ve never heard of. Just cottage cheese, a little Parmesan, and your oven. The result is surprisingly satisfying—crispy on the edges, tender enough to roll, and packed with protein that actually keeps you full.
Table of Contents
Quick Recipe Snapshot
So glad you tried this one! The Cottage Cheese Wraps collection has even more recipes that are just as comforting and crowd-pleasing. Go ahead, take a look — your next favorite dish is right there.
This cottage cheese wrap recipe makes one large flatbread that you’ll fill with seasoned chicken and Caesar salad, then divide into two wraps. The cottage cheese bakes into a sturdy base with a slight chew and nutty, cheesy flavor. Total time is about 45 minutes, with most of that being hands-off baking time. Each wrap delivers serious protein—we’re talking around 35-40 grams—without feeling heavy.
Why You’ll Love This Cottage Cheese Chicken Wrap Recipe
First off, the protein content is no joke. Between the cottage cheese base and the chicken filling, you’re getting a meal that actually sustains you. I’ve had one of these wraps at noon and still felt satisfied well into the afternoon, which is rare for me.
The texture surprised me most. I expected something rubbery or overly dense, but when you bake cottage cheese correctly, it gets these crispy, almost lacy edges while staying pliable enough to fold. It’s nothing like a flour tortilla, but it’s legitimately good in its own right.
It’s also incredibly flexible. Don’t like Caesar? Swap it out. Want to meal prep? These components store beautifully separately. The cottage cheese wrap itself can be made ahead and refrigerated, then quickly warmed before assembling. I’ve made a batch on Sunday and had fresh wraps ready to fill all week.
And if you’re looking for more ways to use chicken in creative high-protein meals, check out this high-protein cottage cheese chicken salad that uses similar ingredients in a completely different way.

Cottage Cheese Chicken Wrap
Ingredients
Ingredients
- 1 cup low fat cottage cheese or full fat; do not use fat free
- 3 tablespoons grated Parmesan cheese
- oil or nonstick spray
- 1 chicken breast lightly pounded into an even thickness
- ½ tablespoon olive oil
- 1 teaspoon paprika
- ¼ teaspoon garlic powder
- ¼ teaspoon kosher salt
- Pinch ground black pepper
- 2 cups chopped romaine
- 3 tablespoons Caesar Dressing more to taste
- 2 tablespoons grated Parmesan
Instructions
- Make the flatbread: Preheat the oven to 400°F and line a baking sheet with parchment paper. Brush the paper with oil or coat generously with nonstick spray. Spread the cottage cheese into an even layer creating a flatbread shape. Sprinkle with 3 tablespoons Parmesan.
- Bake the cottage cheese wrap for 20 to 25 minutes, until golden and set. At 10-minutes, remove it from the oven. If the curds have spread out a lot, use a spatula to very gently scoot them closer together, then continue baking. Let cool completely, then loosen with a spatula and carefully peel off of the parchment.
- Make the chicken: Drizzing the chicken with the oil and sprinkle with the paprika, garlic powder, salt, and pepper, rubbing to coat it evenly. Air fry at 375°F, until the chicken reaches 165°F on an instant read thermometer (I remove mine at 155°F then let it come to temperature as it rests), about 8 minutes for small breast or all the way up to 14 for a larger breast. Let cool 5 minutes, then dice. (You can also bake in the oven at 425°F for 12 to 18 minutes depending upon the size of your breast.)
- In a bowl, toss together the chicken, romaine, 2 tablespoons Parmesan and the Caesar dressing.
- Pile half inside of the wrap, roll, and enjoy. Save the second half for a future wrap.
Ingredients for Cottage Cheese Chicken Wrap Recipe
Let’s talk about what you’ll need for this cottage cheese wrap. The ingredient list is refreshingly short, but a few details matter more than you’d think.
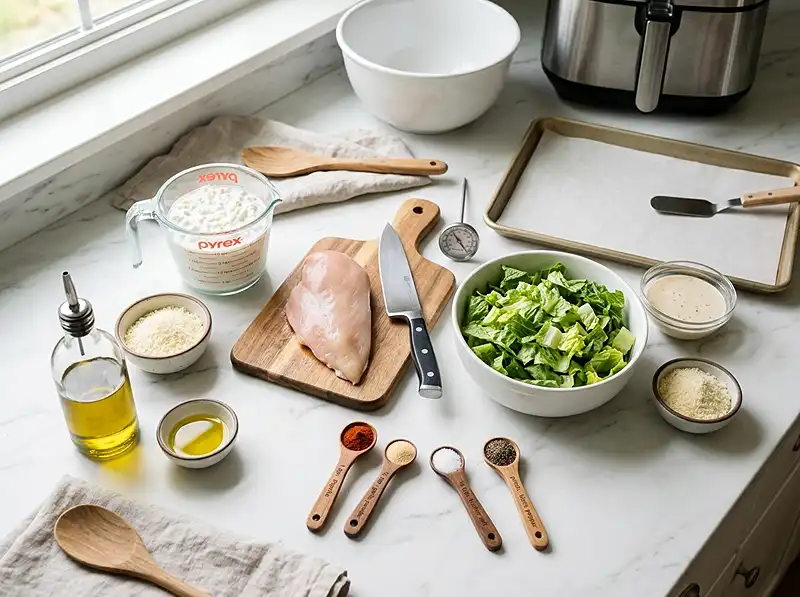
| Ingredient | Amount | Notes |
|---|---|---|
| Low fat cottage cheese | 1 cup | Full fat works too; avoid fat free as it won’t set properly |
| Grated Parmesan cheese | 3 tablespoons + 2 tablespoons | Divided between wrap and filling |
| Oil or nonstick spray | As needed | For the parchment paper |
| Chicken breast | 1 breast | Pound to even thickness for uniform cooking |
| Olive oil | 1/2 tablespoon | For the chicken |
| Paprika | 1 teaspoon | Adds color and mild warmth |
| Garlic powder | 1/4 teaspoon | Not garlic salt |
| Kosher salt | 1/4 teaspoon | Adjust to taste |
| Ground black pepper | Pinch | Freshly ground is best |
| Chopped romaine | 2 cups | Iceberg works in a pinch |
| Caesar dressing | 3 tablespoons | More if you like it extra saucy |
The cottage cheese is the star here, and the fat content genuinely matters. I’ve tried this with fat-free cottage cheese, and it just doesn’t bind properly—you end up with a crumbly mess instead of a cohesive wrap. Low-fat works beautifully, and full-fat gives you a slightly richer result with a bit more browning. Both are great, so go with what you prefer or what’s in your fridge.
For the Parmesan, use the real stuff you grate yourself if possible. The pre-grated kind in the green can works in a pinch, but freshly grated Parmesan melts better and gives you those gorgeous golden spots on the wrap. Plus, it doesn’t have the anti-caking agents that can sometimes make things grainy.
When it comes to the chicken breast, size varies wildly at the store. A small breast might be 4-5 ounces, while a large one could be 8-10 ounces. Either works fine—you’ll just adjust your cooking time. The key is pounding it to an even thickness so it cooks uniformly. I use a meat mallet, but a heavy skillet works too. Just put the chicken between two pieces of plastic wrap or parchment so you’re not cleaning chicken bits off your counter.
Step-by-Step Instructions for Making Cottage Cheese Wraps
This process is more straightforward than it might seem. The cottage cheese wrap takes the longest, but it’s almost entirely hands-off time. You can cook the chicken while the wrap bakes to save time.

- Prepare your baking setup: Preheat your oven to 400°F and line a baking sheet with parchment paper. This is crucial—don’t skip the parchment or you’ll be scraping cottage cheese off your pan for days. Brush the parchment generously with oil or hit it with a solid coating of nonstick spray. You want enough that the surface looks slightly shiny. This prevents sticking and helps the bottom get crispy.
- Spread the cottage cheese: Dump your cup of cottage cheese onto the prepared parchment. Using a spatula or the back of a spoon, spread it into an even layer. I go for a rough rectangle or oval shape about 8-9 inches long and 5-6 inches wide—basically the size and shape of a burrito. Try to keep the thickness consistent, about 1/4 inch throughout. If some spots are thicker, they won’t cook through properly. Sprinkle the 3 tablespoons of Parmesan evenly over the top.
- Start baking: Slide the baking sheet into your preheated oven and set a timer for 10 minutes. This is when the curds start to melt together and form a cohesive layer. The edges will begin to set first.
- Check and reshape if needed: At the 10-minute mark, pull the pan out and take a look. Sometimes the curds spread out more than you want, especially around the edges. If that’s happened, use a spatula to very gently nudge them back together, scooting the stray bits toward the center. Be gentle here—it’s still pretty delicate. Pop it back in the oven.
- Finish baking the wrap: Continue baking for another 10 to 15 minutes, for a total of 20 to 25 minutes. You’re looking for a golden color across the top with darker, crispier edges. The whole thing should look set and fairly firm, not wet or jiggly. Let it cool completely on the pan—this is important because it continues to firm up as it cools. A warm wrap is too fragile to move.
- Prepare the chicken while the wrap bakes: While your wrap is in the oven, get your chicken ready. Drizzle the 1/2 tablespoon of olive oil over the chicken breast, then sprinkle with the paprika, garlic powder, salt, and pepper. Rub the seasonings all over so the chicken is evenly coated. The oil helps the spices stick and promotes browning.
- Cook the chicken in the air fryer: Preheat your air fryer to 375°F. Place the seasoned chicken in the basket and cook until it reaches 165°F on an instant-read thermometer. For me, this is about 8 minutes for a smaller breast or up to 14 minutes for a larger one. I actually pull mine at 155°F and let carryover cooking bring it to 165°F as it rests—this keeps it extra juicy. If you don’t have an air fryer, bake it in your oven at 425°F for 12 to 18 minutes depending on size, checking with a thermometer.
- Rest and dice the chicken: Let the cooked chicken rest for 5 minutes before cutting into it. This lets the juices redistribute so they don’t all run out onto your cutting board. Then dice it into bite-sized pieces, about 1/2-inch cubes.
- Make the Caesar chicken filling: In a medium bowl, toss together the diced chicken, chopped romaine, 2 tablespoons of Parmesan, and the 3 tablespoons of Caesar dressing. Mix it well so everything gets coated. Taste it—if you like things extra creamy, add another tablespoon of dressing.
- Remove the cottage cheese wrap from parchment: Once your wrap has cooled completely, use a spatula to gently loosen the edges all the way around. Then carefully peel it off the parchment paper. It should come off in one piece if you oiled the paper well. If a few spots stick, just work slowly and use the spatula to help release them.
- Assemble your wrap: Place the cottage cheese flatbread on a clean surface or plate. Spoon half of the chicken Caesar mixture onto the lower third of the wrap. Don’t overfill or it’ll be impossible to roll. Fold in the sides slightly, then roll from the bottom up, like you’re making a burrito. The wrap should hold together nicely.
- Serve and save the rest: Enjoy your wrap right away while the textures are at their best. Store the remaining chicken Caesar mixture in an airtight container in the fridge for your second wrap later. You can eat it within the next day or two.
If you’re looking for another way to prepare chicken that’s just as simple but completely different in style, this giant chicken cutlet recipe is fantastic for meal prep.

Expert Tips for the Best Cottage Cheese Wrap
After making these wraps more times than I can count, I’ve picked up a few tricks that make a real difference in the final result.
Don’t skimp on the oil or spray for the parchment paper. I learned this the hard way when I tried to be conservative with the spray and ended up with half my wrap stuck to the paper. A generous coating is your friend here.
Let the wrap cool completely before you try to peel it off. I know it’s tempting to rush this step, especially when you’re hungry, but a warm wrap is fragile and will tear. Once it’s fully cooled, it becomes surprisingly sturdy.
If your cottage cheese has a lot of liquid pooling on top when you open the container, drain off some of that excess whey before spreading it on the pan. Too much liquid means longer baking time and potentially a soggier wrap.
The 10-minute check-in is genuinely important. Different brands of cottage cheese have different moisture contents and curd sizes, so some spreading is normal. Taking 30 seconds to reshape it at the halfway point ensures you get a wrap-shaped wrap, not a weird abstract art piece.
For the chicken, an instant-read thermometer is worth every penny. Chicken breasts are so inconsistent in size that timing alone isn’t reliable. The thermometer tells you exactly when it’s done, and you’ll never end up with dry, overcooked chicken again.
If you’re making this for meal prep, keep the components separate until you’re ready to eat. Assemble the wrap right before eating so it doesn’t get soggy. The cottage cheese wrap can be stored in the fridge wrapped in plastic wrap, the chicken Caesar mixture in a container, and you’re set for quick lunches.
Variations to Try
Once you’ve mastered the basic cottage cheese chicken wrap recipe, the variations are endless. This base is incredibly versatile.
For a Buffalo chicken version, toss your cooked chicken with Buffalo sauce instead of Caesar dressing, add some shredded carrots and celery, and mix in a bit of ranch or blue cheese dressing. It’s got that spicy, tangy kick that Buffalo chicken lovers crave.
Go Mediterranean by swapping the Caesar for tzatziki, adding cucumber, tomatoes, red onion, and some crumbled feta. The cottage cheese wrap actually pairs beautifully with Greek flavors.
Make it Mexican-inspired with taco-seasoned chicken, black beans, corn, salsa, and a squeeze of lime. A little bit of shredded cheddar or pepper jack mixed into the cottage cheese before baking adds another layer of flavor.
For a breakfast version, cook up some scrambled eggs, add diced bell peppers, a bit of cheese, and maybe some crumbled bacon or sausage. The cottage cheese wrap works just as well for breakfast as it does for lunch or dinner.
If you want to change up the wrap itself, try mixing a teaspoon of everything bagel seasoning into the cottage cheese before baking. Or add some dried herbs like oregano, basil, and garlic powder right into the cheese mixture for an Italian-herb wrap.
This easy tuna melt wrap recipe shows another approach to protein-packed wraps if you want to skip the chicken entirely.
Troubleshooting Common Issues
Even simple recipes can have hiccups. Here’s how to fix the most common problems people run into with cottage cheese wraps.
The wrap is too fragile and tears when I try to roll it: This usually means it either didn’t bake long enough or you didn’t let it cool completely. Make sure it’s golden brown with crispy edges before removing it from the oven, and be patient with the cooling time. If it’s genuinely undercooked in the center, you can carefully place it back in the oven for another 3-5 minutes.
The wrap stuck to the parchment paper: You needed more oil or nonstick spray on the paper. Next time, be more generous with the coating. If it’s already stuck, use a thin metal spatula and work very slowly, almost scraping it off bit by bit. You might lose some of the bottom layer, but you can usually save most of it.
The cottage cheese spread too thin in some spots: The wrap will have thin spots that get extra crispy and potentially burn if the layer isn’t even. When you spread it initially, pay attention to thickness. Use the back of your spoon to really push the curds around and fill in any thin areas. The 10-minute check helps catch this too.
The wrap tastes too bland: The cottage cheese and Parmesan provide flavor, but they’re mild. Make sure you’re using enough Parmesan on top—don’t be shy with it. You can also mix a pinch of salt directly into the cottage cheese before spreading if you want more flavor in the base itself. The filling should be well-seasoned too.
My chicken turned out dry: Overcooking is the culprit. Get an instant-read thermometer and pull the chicken at 155-160°F, letting carryover heat bring it to 165°F. Also make sure you’re pounding the breast to an even thickness so it cooks uniformly. Thicker parts will still be raw when thinner parts are already overcooked if you don’t even it out.
The wrap got soggy after I filled it: This happens when the filling is too wet or when it sits too long after assembly. Make sure you’re not overdoing the dressing, and assemble right before eating if possible. If you need to pack it for later, keep the wrap and filling separate and assemble when you’re ready to eat.
Storage Instructions for Cottage Cheese Wraps
Proper storage makes the difference between enjoying these wraps throughout the week and ending up with a soggy, sad mess. The good news is that everything stores well when you do it right.
| Component | Storage Method | Duration |
|---|---|---|
| Cottage cheese wrap (unfilled) | Wrap in plastic wrap or place in airtight container, refrigerate | 3-4 days |
| Cooked chicken (unseasoned or seasoned) | Airtight container, refrigerate | 3-4 days |
| Chicken Caesar filling mixture | Airtight container, refrigerate | 1-2 days (due to dressing and lettuce) |
| Assembled wrap | Wrap tightly in plastic wrap or foil, refrigerate | Best eaten within a few hours; up to 1 day maximum |
The cottage cheese wrap itself stores surprisingly well when kept separate from the filling. Once it’s completely cooled, wrap it tightly in plastic wrap or place it in an airtight container. It’ll keep in the fridge for 3-4 days. When you’re ready to use it, you can eat it cold, let it come to room temperature, or warm it briefly in a skillet or microwave for about 15-20 seconds just to take the chill off.
For the chicken component, store it in an airtight container in the refrigerator. If you’ve already mixed it with the Caesar dressing and romaine, use it within a day or two since the lettuce will start to wilt and release water. If you want longer storage, keep the cooked, diced chicken separate and only mix it with the lettuce and dressing when you’re ready to assemble your wrap.
I don’t recommend freezing the cottage cheese wrap. The texture changes significantly when frozen and thawed—it becomes watery and loses that nice chew. The cooked chicken freezes fine on its own for up to 3 months, but keep it separate from the dairy-based components.
If you’re meal prepping, make 2-3 cottage cheese wraps at once by doubling or tripling the base recipe (use separate baking sheets), store them wrapped individually, then have your protein ready to go. You can fill them with different things throughout the week. One day it’s Caesar chicken, the next it could be leftover taco filling or scrambled eggs.
For packed lunches, the best approach is to pack the wrap and filling separately. Use a container with compartments if you have one, or just use two separate containers. Assemble right before eating and you’ll have the best texture.
Need more inspiration for using up leftover chicken? This frozen chicken tender casserole recipe is perfect for using up extras in a completely different way.
Cottage Cheese Chicken Wrap Recipe FAQs
What are the main ingredients needed for a cottage cheese chicken wrap?
The main ingredients for a cottage cheese chicken wrap include cooked chicken breast (grilled or shredded), cottage cheese, tortillas or wrap bread, fresh vegetables like lettuce, tomatoes, and cucumbers, and seasonings such as salt, pepper, and garlic powder. You can also add extras like avocado, red onion, or your favorite herbs for additional flavor.
How do you make the cottage cheese spread for the wrap?
To make the cottage cheese spread, blend or mash the cottage cheese until smooth and creamy. You can season it with garlic powder, onion powder, dried herbs like dill or parsley, salt, and pepper to taste. For extra creaminess, some people add a small amount of Greek yogurt or a squeeze of lemon juice for brightness. Mix everything together until well combined.
Can I make cottage cheese chicken wraps ahead of time for meal prep?
Yes, cottage cheese chicken wraps can be made ahead for meal prep. However, it’s best to store the components separately to prevent the wrap from becoming soggy. Keep the cooked chicken, cottage cheese spread, and chopped vegetables in separate containers. Assemble the wraps fresh when you’re ready to eat, or assemble them no more than a day in advance and wrap tightly in plastic wrap or foil.
Is cottage cheese chicken wrap a healthy meal option?
Yes, cottage cheese chicken wraps are generally a healthy meal option. They provide lean protein from both the chicken and cottage cheese, which is also high in calcium. The vegetables add fiber, vitamins, and minerals. To keep it healthier, use whole wheat or whole grain wraps, avoid excessive amounts of high-calorie dressings, and load up on fresh vegetables. One wrap typically contains between 300-400 calories depending on the ingredients used.
What can I use as a substitute for cottage cheese in this recipe?
If you don’t have cottage cheese or prefer an alternative, you can substitute it with Greek yogurt, ricotta cheese, cream cheese mixed with a little milk to thin it out, or mashed avocado. Hummus also works well as a creamy, protein-rich spread. Each substitute will give a slightly different flavor and texture, but all will provide the creamy base that complements the chicken and vegetables in the wrap.
Final Thoughts on This Cottage Cheese Wrap
This cottage cheese chicken wrap recipe has become one of those reliable staples I come back to again and again. It checks all the boxes—high protein, genuinely filling, relatively quick, and way more interesting than another boring salad. The first time you make it, the process might feel a little unusual if you’ve never baked cottage cheese before, but I promise it becomes second nature quickly.
The best part is how customizable it is once you get the base wrap technique down. I’ve filled these with everything from breakfast scrambles to leftover pulled pork, and they work beautifully every time. The wrap itself is surprisingly neutral, which means it plays well with just about any flavor profile you throw at it.
Give this cottage cheese chicken wrap recipe a try this week. Start with the Caesar version as written so you can get a feel for the technique, then branch out into your own variations. I’d love to hear what fillings you come up with—tag me if you post your creations on social media, or leave a comment below with your favorite combination. Happy cooking!